Migrating PST files to Office 365 is a crucial process for businesses and individuals looking to leverage the power of cloud-based services. PST files, which are essentially Outlook Personal Storage Tables, contain emails, contacts, calendar events, and other data. By importing PST to Office 365, users can access their data anywhere, anytime, and on any device.
In this article we will explain all the methods you can use and the steps you need to follow to import PST to Office 365
Manual Methods for PST Migration
There are several manual methods to import PST to Office 365:
- Import Outlook PST via Outlook Import Export Wizard: This approach is ideal for transferring a small number of compact Outlook PST files to Office 365.
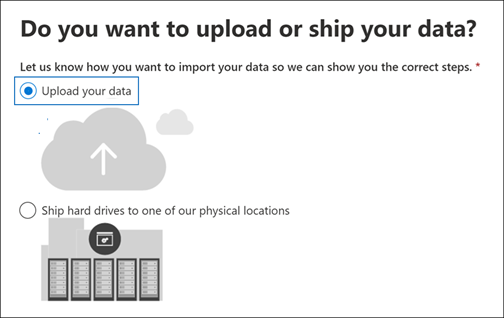
- Network Upload using AzureAZCopy Tool: This method is beneficial when there’s a need to import numerous or sizable PST files into Office 365. It allows for the import of PST files up to 20 GB to circumvent potential performance complications.
- Ship the Drive Containing PST Files to Microsoft: In situations where network or bandwidth issues are a concern, you can opt to securely send your large PST files on an encrypted hard drive to Microsoft. They will then upload the PST files to your Azure Storage for import, for a fee.
Steps For Manual PST Migration
Import Outlook PST via Outlook Import Export Wizard:
- Open Outlook: Start by opening Microsoft Outlook on your computer.
- Access the Import/Export Wizard: Click on the ‘File’ tab in the top menu, then select ‘Open & Export’, and then click on ‘Import/Export’.
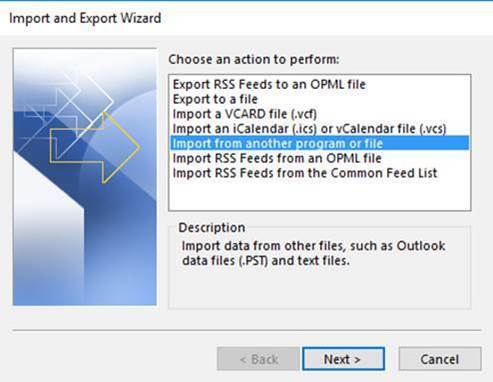
- Choose Import from a File: In the Import and Export Wizard, select ‘Import from another program or file’ and then click ‘Next’.
- Select PST File Type: Choose ‘Outlook Data File (.pst)’ and then click ‘Next’.
- Browse and Select the PST File: Click ‘Browse’ to locate and select the PST file that you want to import. Choose the appropriate options to handle duplicates, then click ‘Next’.
- Choose the Folder to Import From: Select the folder you want to import from. If you want to import all data, make sure the ‘Include subfolders’ box is checked. You can also choose to ‘Import items into the current folder’ or ‘Import items into the same folder in’. Then select the appropriate mailbox if necessary.
- Finish the Import Process: Click ‘Finish’ to start the import process. Depending on the size of the PST file, this process may take some time.
Once the process is complete, the data from the PST file will be imported into your Office 365 account.
Network Upload Method:
- Copy the SAS URL and install Azure AzCopy.
- Upload your PST files to Office 365.
- View the uploaded files.
- Create the PST import mapping file.
- Create a PST import job in the Office 365.
- Filter data and start the PST import job.
- After the job is completed, you can access your PST file data in your Office 365 account.
Drive Shipping Method:
- Copy data to a hard drive.
- Create a PST import job in the Office 365 Security & Compliance Center.
- Ship the hard drive to Microsoft.
Challenges and Limitations of Manual Methods
While manual methods are cost-effective, they come with their own set of challenges. These methods require a good understanding of Office 365 and its related services. They can be time-consuming and prone to errors, leading to data loss. Moreover, they lack features like filtering and selective data migration.
Want your data to stay safe before and after transfers? Check these to prevent data loss:
- How to Reduce The Risk of Identity Theft After a Data Breach
- 5 Ways to Boost Data Security on the Cloud
Automated PST Migration Solutions
To overcome the limitations of manual methods, several automated solutions are available in the market. These tools are designed to simplify the process of PST migration and minimize the risk of data loss. They come with features like data filtering, selective migration, and direct migration to Office 365 mailboxes.
Stellar Migrator for Outlook
Stellar Migrator for Outlook is a reliable and efficient solution for migrating PST files to Office 365. It allows you to import multiple PST files to Office 365 and provides options to map PST files to Office 365 mailboxes.
Steps to Migrate Outlook PST Users Using Automated Solutions
Using Stellar Migrator for Outlook:
- Download and install Stellar Migrator for Outlook.
- Launch the software and click on the “Add File” button to add PST files.
- Click on the “Scan” button after adding PST files and the software will show the preview of mailbox data.
- Fill your Licensing credentials
- Make sure your system has configured with Office 365 Select your Office 365 profile into which you want to import your data.
- Map the PST files to the respective Office 365 mailboxes and click on the “Save” button.
- Click on the “Migrate” button to start the migration process.
- Once the migration process is completed, you can access your PST file data in your Office 365 account.
Kernel Import PST to Office 365
Kernel Import PST to Office 365 is another tool that allows you to import single or multiple PST files to Office 365 mailboxes. It supports all versions of Outlook and Office 365.
Using Kernel Import PST to Office 365:
- Download and install the software.
- Launch the software and click on the “Add” button to add PST files.
- After adding PST files, click on the “Set Filter and Migrate” button.
- Select the “Migrate to Office 365” option.
- Provide your Office 365 login credentials and click on the “Sign In” button.
- Select the mailbox to which you want to import the PST file and click on the “Import” button.
- The software will start the import process. Once it’s done, you can access your PST file data in your Office 365 account.
Aryson PST File Converter
Aryson PST File Converter is a versatile tool that not only allows you to import PST files to Office 365 but also convert them to various other formats.
Using Aryson PST File Converter:
- Download and install the software.
- Run the software and click on the “Select File(S)” button to browse single or multiple PST files.
- Select the mailbox folders and preview the required details. Click Next.
- Now, select the saving format as Office 365.
- Set the saving path to save your file.
- To start the PST file conversion process click on convert.
- Now, PST files successfully convert into other formats. You can access your PST file data in your Office 365 account.
Conclusion
Migrating PST files to Office 365 is a complex process that requires careful planning and execution. While manual methods can be used, they come with their own set of challenges and limitations.
Automated solutions like Stellar Migrator for Outlook, Kernel Import PST to Office 365, and Aryson PST File Converter offer a more efficient and reliable way to carry out the migration.
They come with advanced features and user-friendly interfaces, ensuring a smooth migration process. By choosing the right tool and following the correct steps, you can ensure a successful PST migration to Office 365.


