If you think that being an Administrator on Windows gives you complete control on the system, then think again. When you try to remove or delete some files and folders from your system, you get this error message which says- “You need permission from TrustedInstaller.” If you have seen an error message like this on your screen, then you know that you and Microsoft are at different places when it comes to having authority as an administrator. It is the added protection given to Windows, but still, we have ways to fix it. And so this article is for all those who want to have the final say and are wondering how to fix “you require permission from TrustedInstaller” error. Let us begin with what is TrustedInstaller and how to take ownership from TrustedInstaller or even how to remove TrustedInstaller.
What is TrustedInstaller? How does it Work?
The Windows folder and the Program Files folder on your device contains a lot of system files which the user account owns. And so the TrustedInstaller is this built-in user account in Windows Vista, Windows 7 and Windows 8. It also holds the folder called Windows.old which is formed after you upgrade from one version of Windows to the higher one. And so to rename the files from these folders or change their location, you need to get the ownership from TrustedInstaller.
If you try to complete the action without ownership, then you will see this error message. Get answers to questions like how to get ownership from TrustedInstaller and how to fix you need permission from TrustedInstaller error here.
Fix “You Need Permission from TrustedInstaller”
You can fix the error that appears when you do not have ownership from TrustedInstaller by taking ownership of the files and folders. There are a few methods by which you can grant yourself the permission to delete, edit or rename the files and folders under the ownership of TrustedInstaller. So let us begin.
Method I- Take Ownership Using Windows Explorer
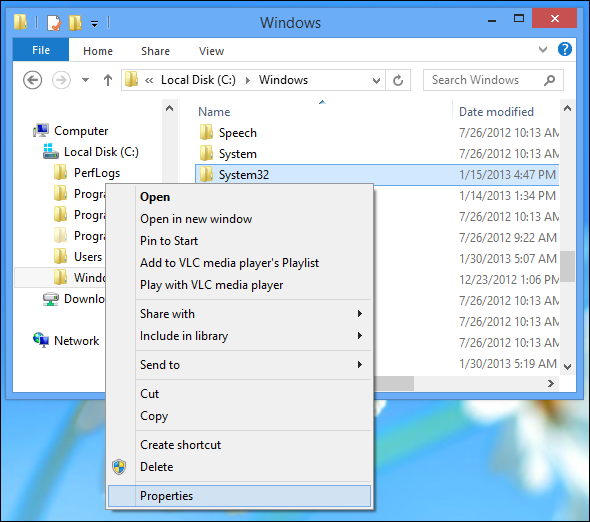
Step 1: To begin the process, right-click on the file that you want to delete and then click on Properties.
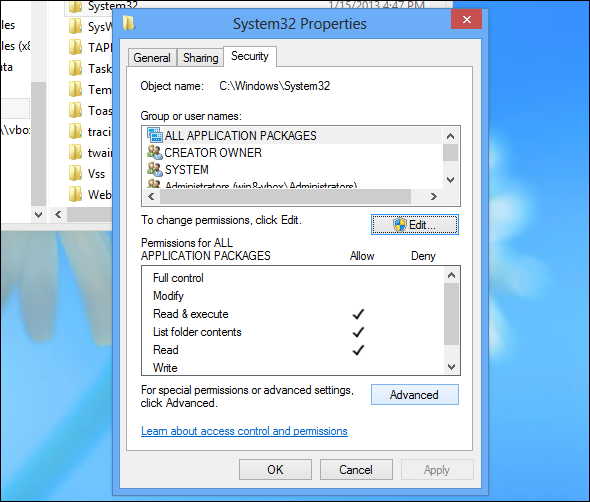
Step 2: In the Properties window, select the Security tab and then hit the “Advanced” tab present at the bottom of the window.
Step 3: Now in the next window that will open, you will see “Owner: TrustedInstaller” at the top, right next to this, you will see the Change option. Click on it.
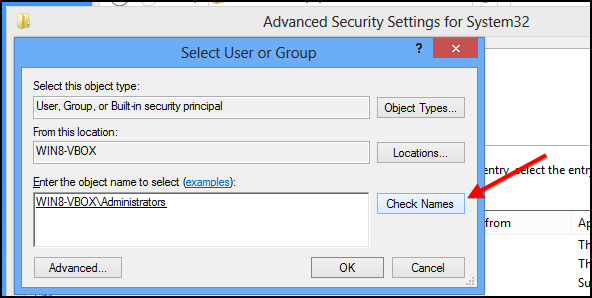
Step 4: In the next step, type “Administrators” in the checkbox present below the option which says “Enter the object name to select.” After you type, click on Check Names tab present at the right side and then click on OK.
Keep in mind, that you write Administrator in the box if you are one. Otherwise, you can write the username that you are using the system.
Step 5: In the next step, tick the checkbox against the option “Replace owner on sub containers and objects.”
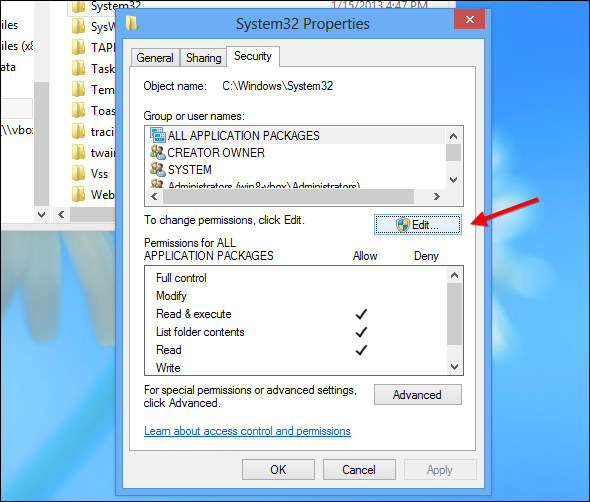
Step 6: Now in the Properties window, click on the Edit tab.
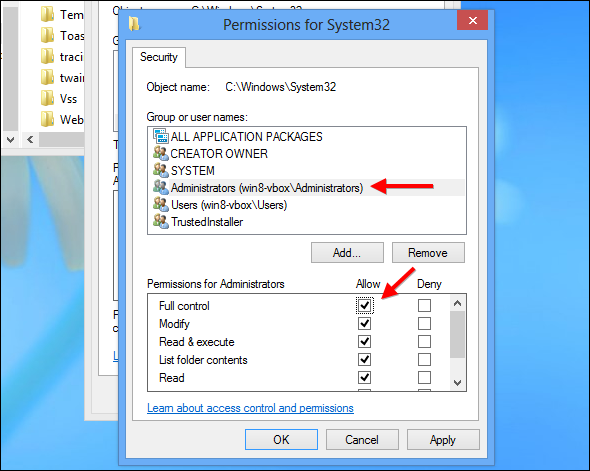
Step 7: Next choose the user name that you are using, like Administrators and then in the checklist below tick the box against Full Control. Click the OK option twice, and our new settings will save.
You will now have the permission to edit, rename and delete the files and folders. Use the method mentioned above and embrace your new power.
Method II- Take Ownership Using CMD
There is another way by which you can take the ownership and fix the error. This process is simple than the previous one and won’t take much of your time. So just follow the given steps.
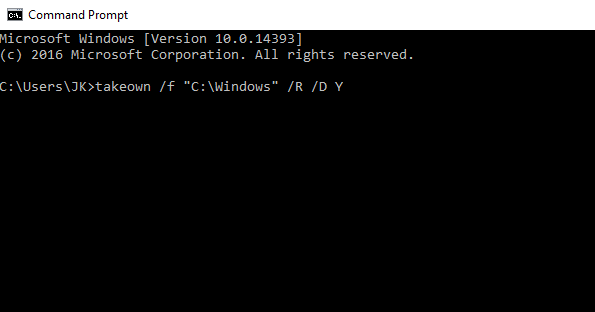
Step 1: As an Administrator, open the Command Prompt and type- “takeown /f “full path of the folder or drive” /R/D Y.” for example- “takeown /f “C:\Windows” /R/D Y.”
Step 2: You can also use this method for executable files like- “takeown / “C:\Windows\regedit.exe.” By this way, you would be able to take the ownership of regedit executable.
Sometimes you face this error when you try to delete the files after updating the Windows to the latest version. And so when you try to remove the Windows.old folder, the error might come up. In such case, you need not take the ownership. Instead, you can use Disk Cleanup Wizard. The process is simple if you follow the steps carefully.
Using Disk Cleanup Wizard to delete Windows.old folder
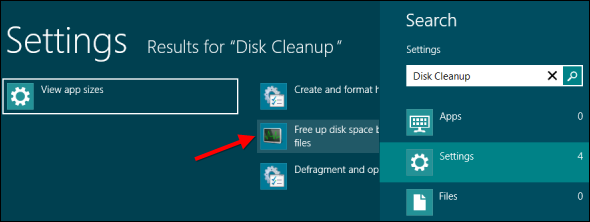
Step 1: Open the Disk Cleanup wizard by pressing the Windows icon key and typing Disk Cleanup.
Step 2: In the Disk Cleanup Window that opens, click on Clean up system files option.
Step 3: A list of the system files that you get to delete will display. If the Windows.old folder is on your hard drive; then you will see the “Previous Windows Installation.” Tick the check box against it and click OK.
The Windows will delete the Windows.old folder and so make sure to retrieve any important files before you perform the Disk Cleanup.
TrustedInstaller Permission & CPU Fix for Windows 7/8/10
The TrustedInstaller checks on your updates and installs them for you. For this process, it acquires a lot of CPU usage. And so you can reduce the CPU consumption by TrustedInstaller through this method. Though through this process the CPU usage will not nullify completely, it is still a preferable alternative.
Method I- Using Windows Module Installer
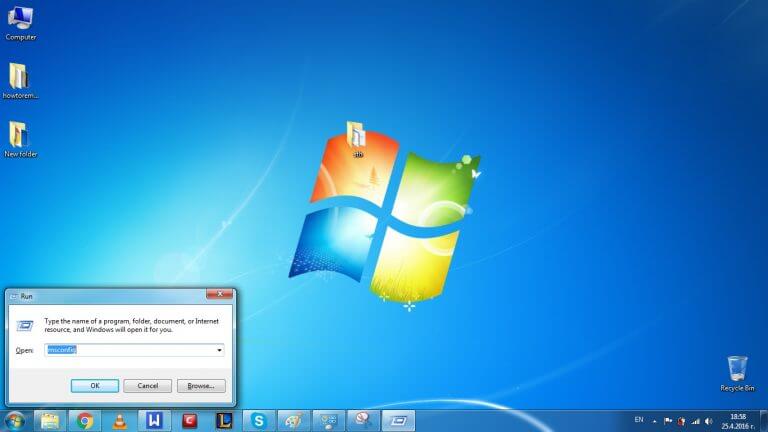
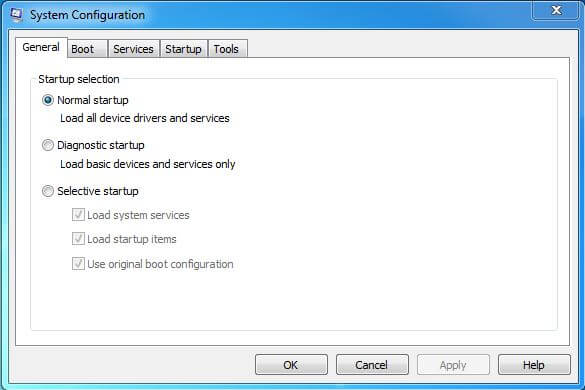
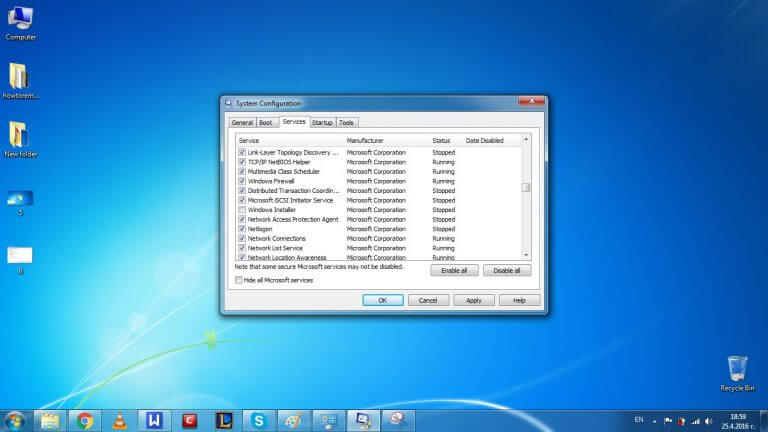
Step 1: Press the Windows key +R together and type msconfig in the box. Press Enter.
Step 2: Single out Windows Module Installer by unchecking it in the new window.
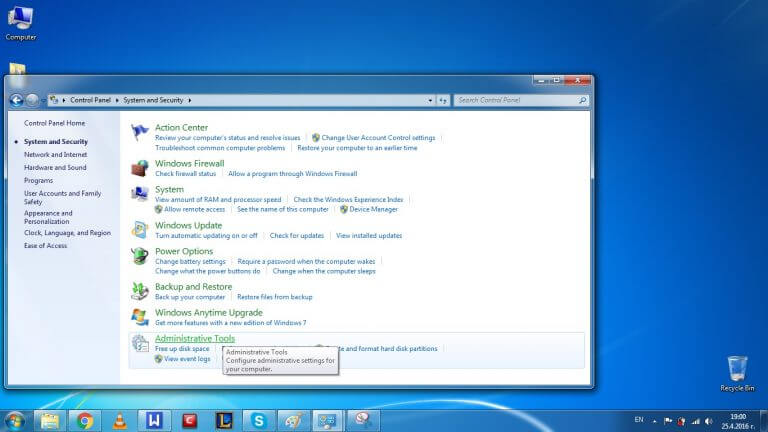
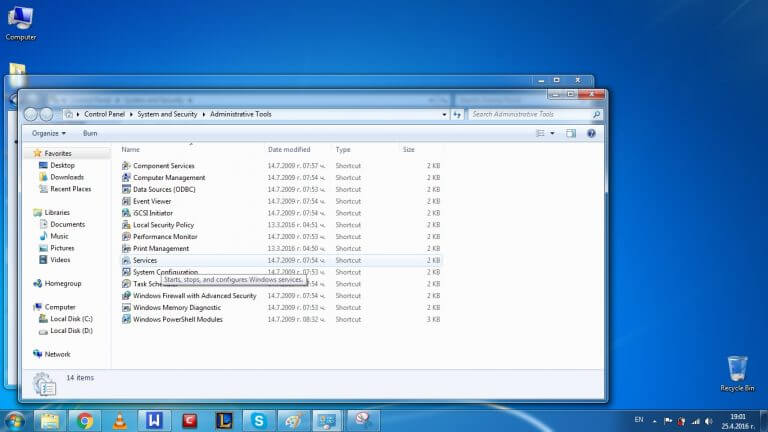
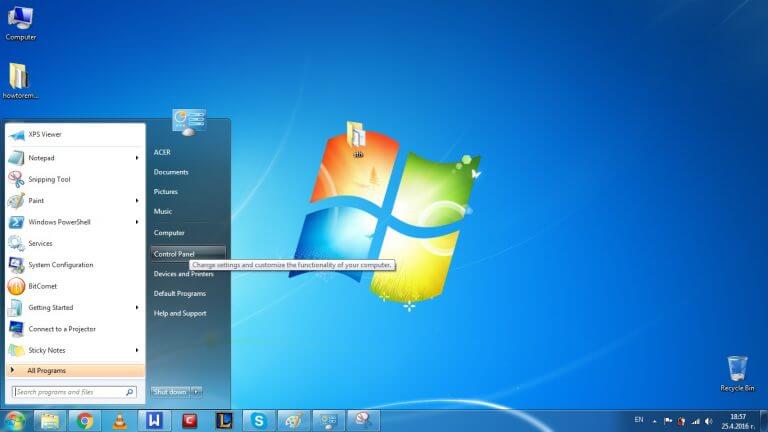
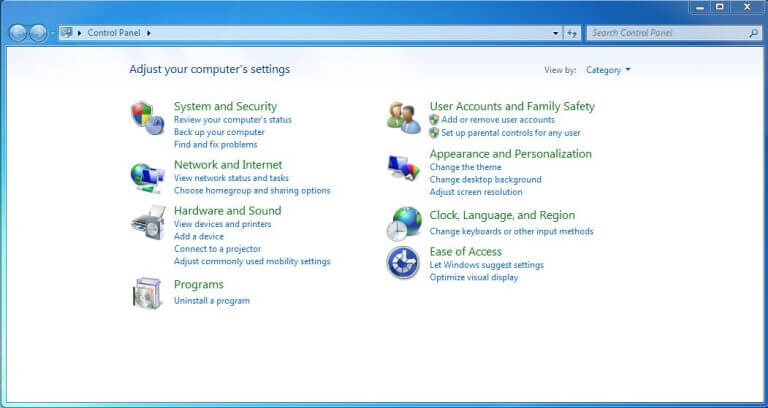
Step 3: Now open the Control Panel and click on System and Security. Next, open the Administrative Tools and then click on Services.
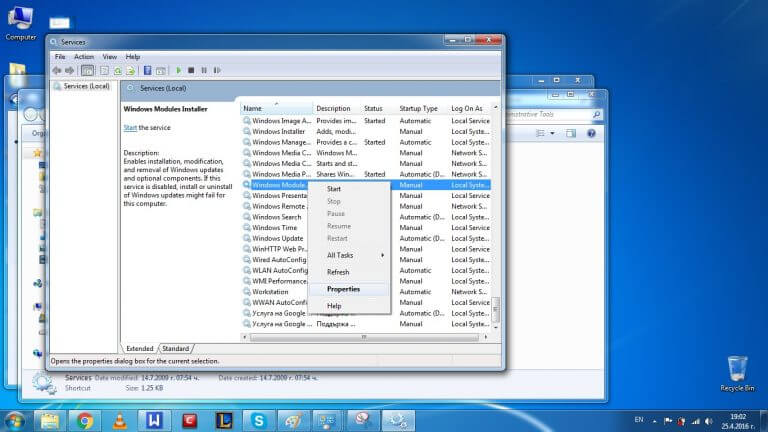
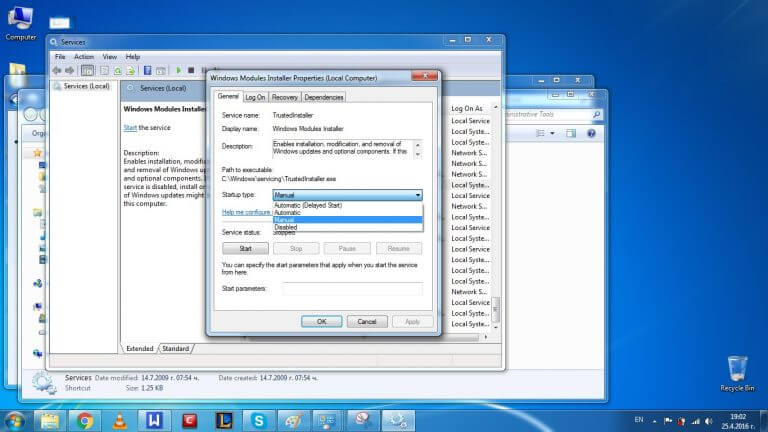
Step 4: Now again single out Windows Module Installer from the long list. Right click on it and then go to its Properties. Now click on the General tab and change the startup type to Manual.
As you do this, the Windows will not have the Windows Module Installer start along with it. And so by this way you can control it manually and fix TrustedInstaller CPU usage problem.
Method II- Alter the Windows Update Settings
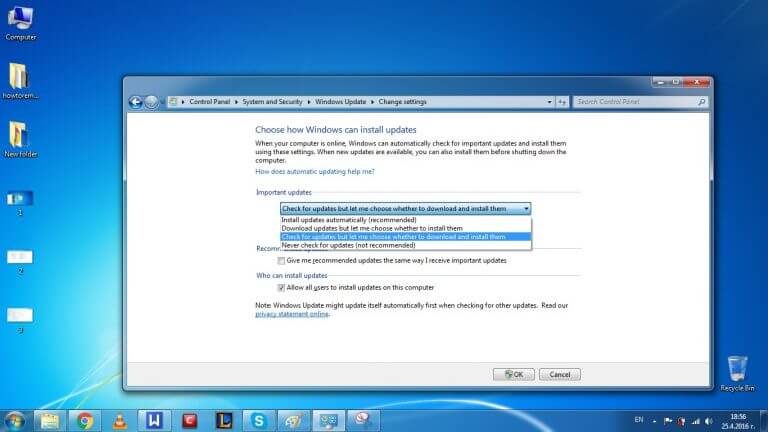
The second method that we will like to suggest is that you change the Settings of the Windows Update. By enabling this option, without your permission, no update will download or install on your system. Follow the given steps to fix TrustedInstaller CPU Usage.
Step 1: Go to Control Panel and click on System and Security.
Step 2: Then select “turn automatic update on or off.” As you will click on this, four options will display on your screen.
- Install updates automatically
- Check for updates, but let me choose whether to download and install them
- Download updates, but let me choose whether to install them
- Never check for updates
From these options, you can choose any one that suits you the best. Though you might find the last option the most feasible and low on CPU usage, we would recommend you to choose the second alternative mentioned here.
These were the best ways to fix the error that you can use to take ownership from TrustedInstaller. The error usually appears when you try to edit, or delete, or rename these specific files owned by TrustedInstaller. And so we hope that now you know how to fix “You require permission from TrustedInstaller” error and will be able to take ownership of these files easily.

