Want to know how to change margins in Google Docs?
Great! you are at the right place because here I’m going to tell you not one but two ways to effectively change or adjust margins in your Google Docs.
Google Docs is a word processing software. It is a free and web-based software offered by Google. It supports both Desktop and Mobile Devices including Android and IOS. There are some page constraints on a page in Google Doc to make the page look neat and clean. These constraints include page margins, font size, color, etc. Even when you open an existing document, the default margins are already present in that document. The default margin constraints in a new Document is 1 inch from all four sides of the page. Sometimes, you need to change these margins as per your need for your Document.
You might also be interested in:- How to Download Documents & eBooks from Scribd for Free
So, here in this article, I will tell you ways to change the margins of your document on Google Docs. I will cover two methods to do the following. Both methods are working and described in a very simple way. You can use these methods mentioned below in both your Windows or Mac Desktop. As all you need to do to open Google Docs is to use your Browser and redirect to its website. I can guarantee that after briefly following this article, you will never have to look anywhere else on the Internet to know ‘How to change margins in Google Docs’. So let’s now start with the article.
Changing Document Margins on Google Docs
In this section, I will be listing 2 methods that will help you to change margins in a document on Google Docs. The first method uses a shortcut by using the Margin ruler to set your Margins for the Document. In the second method, I will tell you how to navigate to the Page Setup options and manually set all the margins for Top, Bottom, Left and Right of the Page. Since Google Docs is a web-based application, it doesn’t matter if you are using it on your Windows Desktop or Mac. The steps remain the same.
Page Margins are important to correctly adjust our Paragraphs in a document. These margins help the document to look neat and clean. Also, they provide a professional look to these documents. So let’s start knowing ‘How to change margins in Google Docs’.
Changing margins using Margin Ruler
There is a ruler on top of the document which shows you the mage size and the margin from the left and right of the page. It also shows the length of the margins and the page. This is important to know how the printed page will look like. Below I have mentioned steps to change the Margins using this ruler. So, let’s start to know ‘How to change Margins on Google Docs’ using the Margin Ruler.
- Navigate to https://docs.google.com from your Browser.
- Create a New document or Open an existing one.
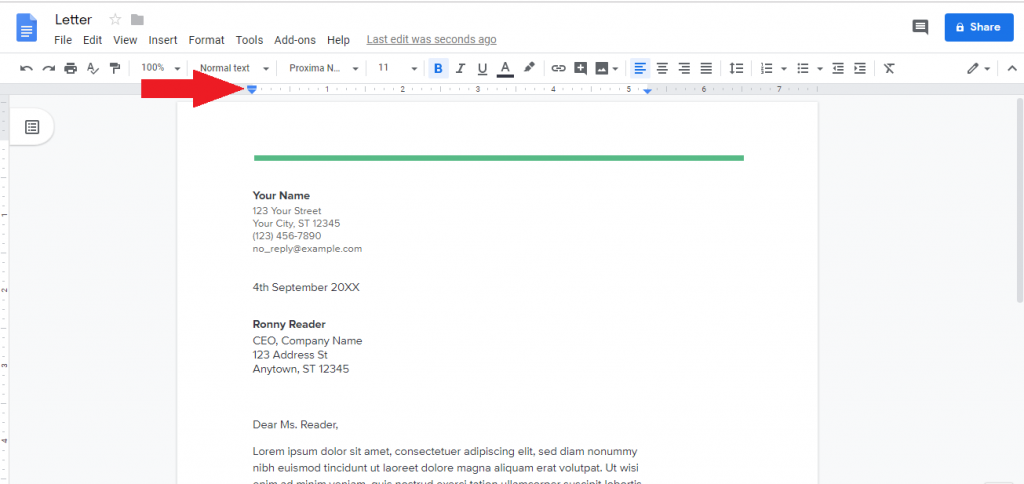
- Find the ruler at the top of your Document. Refer to the image below for more details about the location of the Margin Ruler.
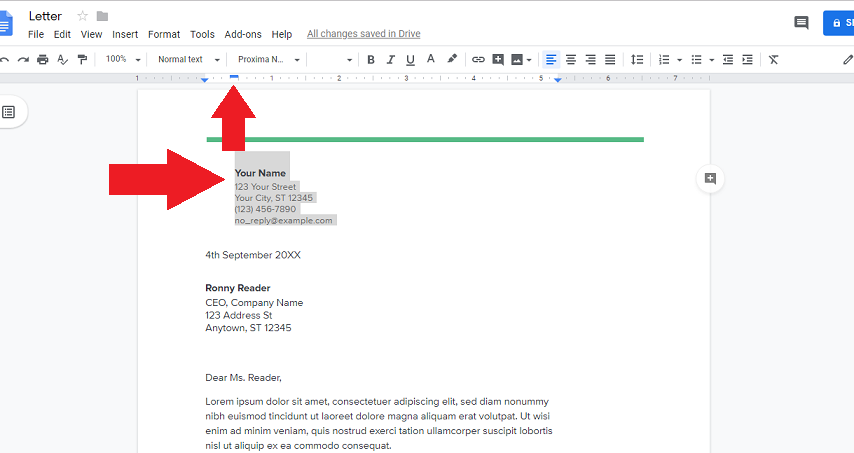
- Select the line or Paragraph from the existing document whose margins you want to change.
- Now on the Ruler, I have shown you before. Find a small rectangle bar on the left side of the ruler. You will also see a Triangle bar below this rectangle bar.
- Now hold this rectangle bar and drag it to the right side to change the left margin of your Document.
- Same you can do with the right rectangle bar on the ruler. Drag it to the left to change the right margin.
Yay! you have learned to change the margin of a document in Google Docs. The selected lines or paragraphs will adjust as per the margin in the Margin ruler in case of an existing document. All the lines after setting up the margin will adjust as per this new margin, for a new Document.
You Might Like This:- 9 Best Google Chrome Extensions for Facebook
Changing Margins using Page Setup
I have already covered how to change margins using the Margin ruler in Google Docs. Sometimes, you want to have some correct margin length and can’t count on the approx value of this ruler. Here, the page setup settings come into play. So let’s now look into ‘How to change margins in Google Docs’ using the Page Setup Settings.
- Navigate to https://docs.google.com from your Browser.
- Create a New document or Open an existing one.
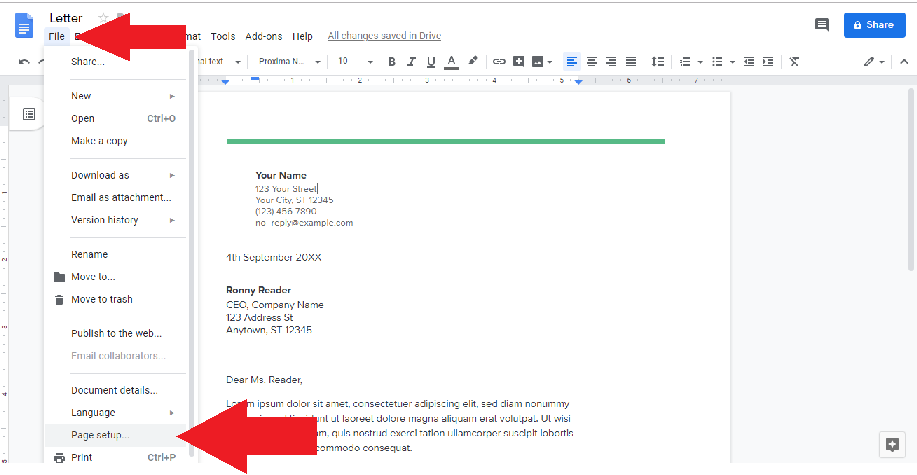
- Now from the Title bar, find the File option and click on it.
- In this File option, find the Page Setup option. Click on it.
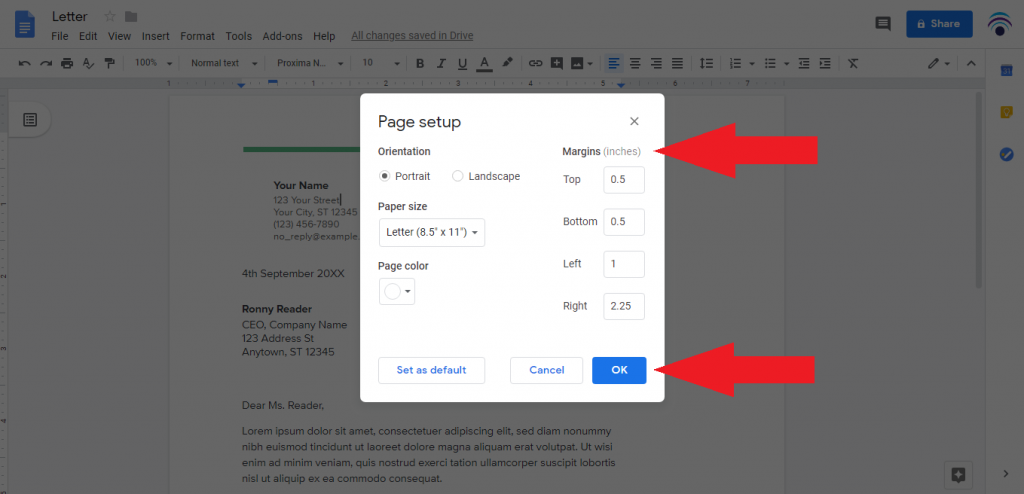
- A new Windows will open. In this new windows, find the Margins (inches) written on the right side of the box.
- Here you can enter your desired Margins, in the input box in front of the Side of the Margin mentioned.
- Lastly, click on the OK button.
Hurray! you have just set your Margins for your Document. After you click the Ok button, the lines in your Document will automatically format as per the margins set in the Page Setup Box. Note that all the Margins you have entered are in Inches and the same will be reflected in the paper print of this Document. You can even set your entered margins as default by clicking on Set as Default button in the Page Setup box. This will automatically set the same Margins for all your future documents.
You might also like this:- How To Save Webpage as PDF [Windows, Mac, iOS, Android]
So that’s it for this article. I hope you are able to understand everything and can now easily apply it to your own Documents on Google Docs. If you are having any confusion or queries regarding any method or step. Feel free to mention that in the Comments Section below. I will be happy to help you with that. I hope now you don’t have to search ‘How to change Margins in Google Docs’ anytime in the future on the Internet.


