Want to know how to host on twitch? Having trouble hosting your stream on Twitch?
Then this article is for you.
Twitch is a live video streaming platform where you can stream live videos on your channel for your subscribers or Community. It is a platform to showcase your talents to a wide range of users. Twitch is most popular among gamers for gaming Live stream. It also hosts various other Singing and other creative content live streams.
It is not always possible for you to host live streams and keep your Community or Audience busy. To keep your Audience active when you are not streaming anything is by hosting other channel’s stream. You can do this by using the Host feature of Twitch. This will keep your Channel as well as your Community Active. It will also Help small channels to host their live streams on a big channel and promote their video in the community. So Here, in this article, I will be telling you various methods by which you can easily host someone’s live stream on your own channel.
You will like this video: OBS vs Xsplit: Best Streaming Software Comparison
Hosting Live Streams on Twitch
There are various advantages of hosting someone else channel on our channel. Firstly, it helps to promote small channels to a large Community or Audience. Also, it helps maintain your Channel and your Community Active when you don’t have original content to currently stream on your channel.
In this article, I’ll be covering methods for both, The Twitch website from your Windows or Mac Desktop and The Twitch app from your Android or IOS Device. So let us start to know “How to host on Twitch”.
Check This: Best Twitch Streaming Software (Top 10)
How to Host on Twitch Using Windows or Mac
Hosting on Twitch using Windows or Mac Desktop is exactly the same. Since all we require is redirect to the Twitch website and follow the below-mentioned method. Here I will tell you how you can host a live stream on your Twitch channel using your Desktop. So let us start to know “How to host on Twitch” using Windows or Mac Desktop.
- Open Browser on your Desktop and redirect to the Twitch website. You can redirect to the website directly by clicking on this link: http://www.twitch.tv
- You now have to Log-in to your ID on Twitch using your Username/Email and Password. If you are new on Twitch, you need to Sign up before proceeding.
- Now click on your Username on the top Right corner of the Website. A drop down Menu will appear below it.
- From this Drop Down Menu, find and click on Channel option.
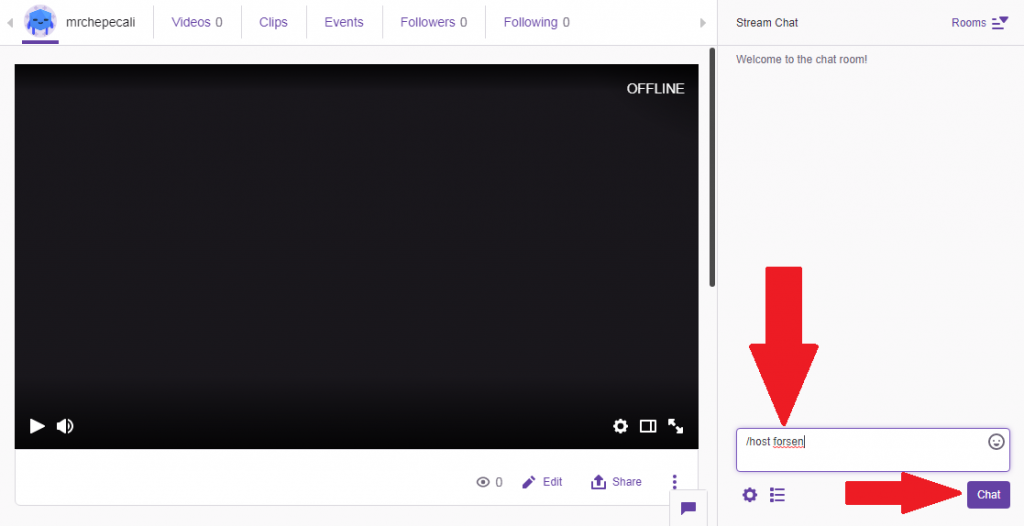
- After clicking on this Channel option, a new page will open which will display your Channel along with the Chatroom along its side.
- In the chatroom, type /host channel_name in the message bar. Instead of channel_name, you should write the name of the channel that you want to host. For example, if you wanted to host the channel XYZ, you should write /host XYZ in the chat box and hit Enter.
And that’s it. If you want to stop this host, you just have to again go to the chatroom and type /unhost in the chatbox and hit Enter. This will stop the hosting of the live stream on your Channel.
You might also be interested in:- 5 Best YouTube Intro Makers to Create Stunning Intro Videos
How to Host on Twitch using Android or IOS
Using the Host feature on Android or IOS Devices is a bit different than using the Host feature on Desktop. Here I will tell you how you can use the Host feature on Twitch using the Twitch App on Android or IOS Mobile Devices. So let us start to know “How to host on Twitch” using Android or IOS.
- Open your Icon tray on your Mobile and find the purple colored Twitch app. Now click on it.
- You now have to Log-in to your ID on Twitch using your Username/Email and Password. If you are new on Twitch, you need to Sign up before proceeding.
- Now tap on the Avatar/Profile pic on the top left corner (On iPhone) and on the top right corner (On Android) of your Mobile screen.
- In this new Activity, tap on the Chat option. You can find it below the title bar on the Twitch app.
- The chatbox will open. Here in the message box type /host channel_name and tap Send.
Hurray, you have successfully hosted the channel named channel_name on your channel. Instead of channel_name, enter the name of the channel that you want to host. To stop this hosting of the channel, again go to the chatbox using the steps mentioned above and type /unhost in the message box and tap Send.
Using Auto-Host Feature on Twitch
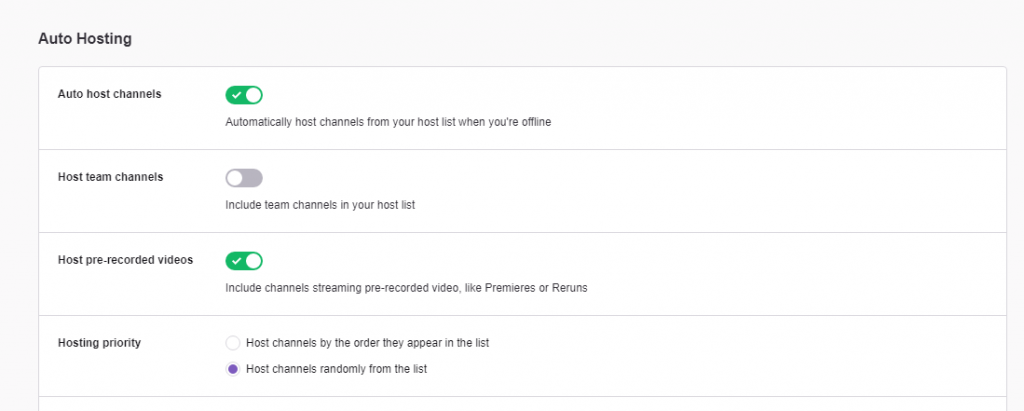
Again and again, going to the chatbox and typing commands is a bit tiresome. There is a feature in Twitch name Auto Host. The Auto Host automatically starts hosting live streams of the channels you have set whenever you go offline. This way you can keep your Channel and Community engaging without even bothering typing any commands. To enable and correctly set up the Auto Host feature on your channel, follow the below-mentioned steps.
- Open the Twitch app and move over to the Channel Settings from the App.
- Scroll down and find the Auto Host option in these settings.
- Turn the switch ON.
- Now click on the + sign in the top right corner of the Host List section and type the name of the channel that you want to add to your list.
- Lastly, click on Save Changes.
And that’s it. Now whenever you will go offline, your channel will automatically start hosting the channels that you have added in your list. This auto host feature can choose channels on the list randomly or via their order.
You need to see this:- How To Download Facebook Live Videos [3 Methods]
So that marks the end of our article. I hope you are successful to host another channel on your channel on Twitch using the methods I have mentioned above. If you having any type of trouble/Error while following the above methods, you can comment that in the comments section below. I hope now you know “How to host on twitch” using any Devices.


