There are many times when you will need to share your Windows PC with someone else. And at that time having a Guest Account on Windows comes handy. How to create Guest Account in Windows 10 is what you’ll learn today in this post.
Talking about Windows guest account, it lets other people use your computer or PC without letting them access to your personal files. Creating Guest account comes in handy when you wish to share your computer temporarily with others. Currently, Windows 10 no longer features creating a Guest account to share your PC. Well, in that case, you can create a restricted account to emulate this kind of functionality.
Windows earlier used to have a dedicated Guest account enabling someone to use your computer temporarily. And at the same time ensuring that they will not see your private data. But Now Windows 10 no longer allows you to turn on the guest account from the Control Panel. But for everything, there is a workaround, and here too you can learn to enable a guest account. You can add Family members and other people as users to your PC, whether they have or not have a Microsoft Account. This gives them the limited access to your PC.
Across the web, you will find many such articles that focus on answering your query. But not all methods will be helpful. While creating the guest account in Windows, you don’t have to use your account or create a special account for each guest.
What is Guest Account in Windows?
The concept of a creating guest account is quite interesting. A Guest account is a locked-down account that you can let other people use on your PC for accessing the internet. Apart from this, you can do basic tasks such as run apps, play music and much more. You can do all these while keeping your files, settings, and everything else safe. But when Microsoft rolled out Windows 10 the Guest account option disappeared.
However, some elements that are required to create a guest account are still available in Windows 10. Thus this makes it possible for you to create your restricted account letting guests use your PC. All you need is the user assembly to carry out this task. And on the other hand, these accounts will not change system settings and will not install or remove any new programs.
There are different ways that let you enable the Guest account in Windows. Moreover, it also lets you manage to turn on the account without even showing up on the sign-in screen.
How to Create Guest Account in Windows 10?
There is one permanent method that requires entering certain simple commands. But the temporary method that can be applied is that you can create a new user account and then later assign it to the guest’s group. In this way, your account will act same as the built-in guest account should work in Windows 10. The user then will be able to use your PC without accessing any settings or installing of the apps.
The temporary method that can be applied is that you can create a new user account and then later assign it to the guest’s group. In this way, your account will act same as the built-in guest account should work in Windows 10. The user then will be able to use your PC without accessing any settings or installing of the apps. Here’s the complete process in detail.
Enable Guest Account Using Command Prompt in Win 10
This is the most suitable method for creating a guest account in windows 10. You need to insert certain commands as required and then you are done. Also before you begin following the mentioned steps create a system restore point of your PC first.
Step 1- Click on Start button from desktop Window.
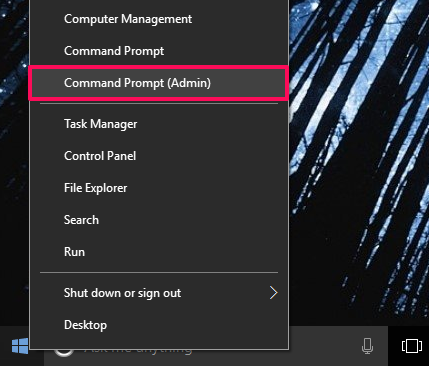
Step 2- Then look for the Command Prompt option in the displayed list. Select the Command Prompt Admin option.
Step 3- Right click on Command Prompt. And then select Run as Administrator.
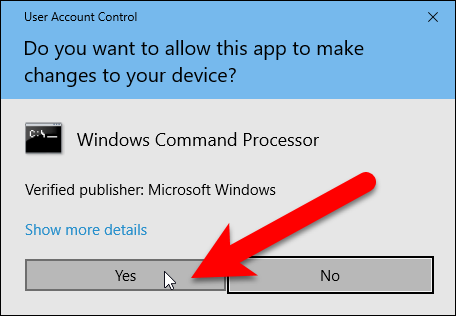
Step 4- Click on Yes if it asks to continue.
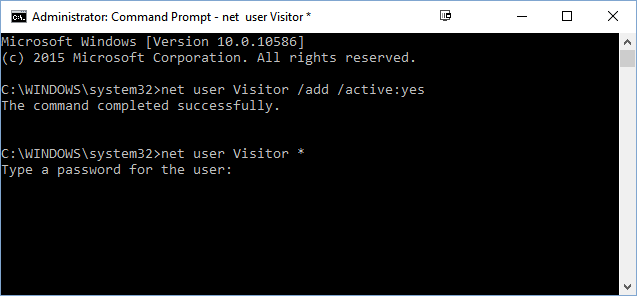
Step 5- Now you need to add a user account on your PC. Type the following command for creating new user account. Hit Enter.
net user Visitor /add /active:ye
Make sure that you are using visitor as the name of the new account. This is because Windows 10 has reserved name as a Guest. Hence you are not permitted to use it. In addition to this, you can use any other name but keep it short.
Step 6- You will be asked to set a password. To create the password for newly created account, type the following command-
net user Visitor *
Step 7- Press Enter twice to create an empty password. The blank password will be created for your account.
Step 8- Type the following next command for removing the new user account from your default Users group. Press Enter.
Net localgroup users Visitor /delete
This removes the visitor user from the default users group.
Step 9- To add the new user account to the Guests user group type the following command. Again hit Enter.
Net localgroup guests Visitor /add
Step 10- Close the command prompt window finally to complete the task.
Using the steps mentioned above you are creating a traditional standard account. But on the other hand removing it from the Users and then adding it to the Guests user group will give your account all the same permissions as you would find in your old Guest account. Once you are over with this, all you need to do is sign out of your current account and use the Sign In screen. From there select the Visitor account and click the Sign in a button where you require no password.
Hence with this newly restricted account that you just created, you can securely share your PC with guests. It will allow others to access the internet and use certain applications. But as usual, they will not be able to change the settings, install programs, and or access any of your files.
Further, if you do not wish to use the account anymore, you can go to Settings > Accounts > Family & other people. Then select the Visitor account. Finally, click on the Remove button for deleting the account.
How to Switch to the Guest Account in Windows 10
If you wish to switch to the guest account on your Windows 10, the below-mentioned steps will help you to do so-
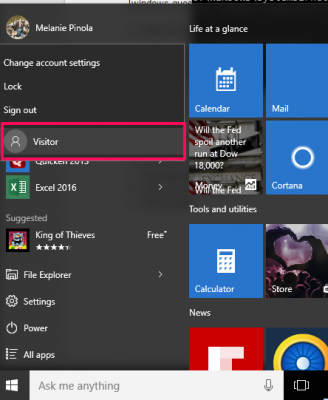
Step 1- Click on the Windows button.
Step 2- A start panel will display on the screen. Then select your username.
Step 3- Finally Click on Visitor.
That’s it! Your process completes here successfully. Using the method mentioned you can learn how to create a Guest account in Windows 10. The method is simple to follow and easy to apply. Try it, and your job will be done.


