Searching for “how to make a Discord bot”?
Search no more. This article will teach you about making your own Discord bot for your channel or server.
Discord is a voice and text messaging app that is popular among Gamers. In Discord, you can create your own Server or join various gaming servers where you can interact with a community. Community with similar interests like you. After creating a Server, you can create channels inside it on various categories. I believe you have already played with Discord Servers and Channels and now want to create your own Discord Bot. Automated Discord bots are a cool feature of Discord where you can create bots using Javascript. You can teach this bot to greet new people and do a lot of automated tasks without you doing anything. All it requires you to code it once.
You might also be interested in:- 10 Best Discord Bots to Improve Your Experience
Here in this article, I will be covering step by step guide to create your own discord bot for your Channel. I advise you to follow it carefully. It doesn’t require you to be good at coding or kinds of stuff to do it. All you have to do is follow carefully all the steps. I have given all the codes in this article. So let’s start with our article.
Making your own Discord Bot
Creating a Discord bot is not hard but it requires Javascript codes and some technical work with servers which can be a bit complicated for you. But don’t worry. I can assure you that I will be explaining it in such simple terms that it will not take your much time to successfully create it. We will be covering creating a bot to writing code for it to deploying it on your server. So let us learn “How to make a Discord bot” in easy steps.
Check This: How to Stop Discord from Opening on Startup
Downloading NodeJs for your Discord Bot
NodeJs is an opensource runtime of Javascript. It will act as a back layer i.e configure and develop your bot. Follow the below-mentioned steps to download and install NodeJs on your computer.
- Firstly, all you have to do is over to NodeJs website or just click here: https://www.nodejs.org
- Download the NodeJs by clicking on one left green button. Your downloading will start.
- After completion of the download, click on the setup. A setup wizard will open.
- Keep clicking on Next until you see an Install button.
- Now click on install. Let it complete.
- Click on Finish.
You have properly set up NodeJs on your computer. So this is all we need to code our smart little bot for our Discord server. Let’s see how you can create one.
Check this: How To Block Someone On Discord
Creating your Bot for Discord Server
In the previous steps, you installed all the dependencies that you will need to code your Discord bot. Don’t worry, you don’t have to code anything. I’ll provide you with codes for your bot. You just need to copy those and follow the steps. So let’s start to know “How to make a Discord bot” for your own Discord server.
Step 1:- Registering/Starting Discord bot
In this step, I will tell you how to start a bot on our Discord server. All we need is to authorize our bot to the Discord server so that it recognizes your code for the bot and add it to bot’s configuration. Follow the steps given below to start with your Bot.
- Open http://www.discordapp.com/developers/applications/me on your Browser.
- Your browser will redirect to the Login page. Log-in with your account.
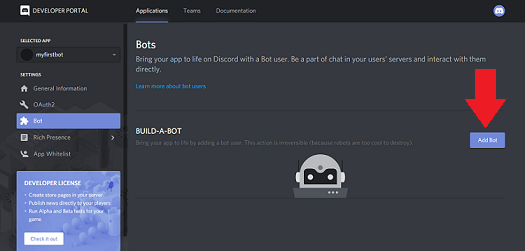
- Now after you Log-in, you will see a Discord Developer Portal on your Browser.
- Here, find and click on New Applications.
- Now give your bot a Name and click on Save Changes.
- Find and click on the Bot option on the Right-hand side Menu.
- Under the Build-a-bot option, find and click on Add bot.
Done, you can now see the bot you just created. There can be multiple bots if you previously had one. Select the name of the bot you just created.
Step 2:- Getting your Bot’s Authorization Token
You have now created your bot on the Discord server. All you have to do now is adding the functionality and configuration of the bot that you have just created. First, we will add the authorization token to our Discord bot. Don’t share this Authorization Token with anyone as it is the code which will help you to control your bot. Let us see how we can create it.
- From the screen from the previous step, find the Bot User Box.
- In this box, find the words: Token: Click to reveal.
- Click on the link and copy the code shown on the screen.
This is the authorization token that your bot needs to get authorized with the server. If you think, someone knows your Token, you can just come back here and click on Generate a new Token. You will learn the implementation of this token in the next steps.
Step 3:- Sending the bot to your Server
After getting the Authorization token, the work that remains is sending our bot to the server and applying all the codes and configuration to our Bot. Let us first see how to send our bot to Discord Server.
- Now click on General Information from the Side Menu.
- Find your Client Id from this box. It will be a long number.
- Copy it and paste it in the URL given below by replacing the CLIENTID in it.
https://discordapp.com/oauth2/authorize?&client_id=CLIENTID&scope=bot&permissions=8
- Now paste this URL in the URL bar of your browser and click Enter.
- On this website, you can deploy your bot by selecting the server.
- Lastly, click on Authorize.
Now, whenever you open Discord in your App or through the browser, you will see a bot in the Online Members in the side menu. That’s it, your bot is now on your Discord server.
Step 4:- Coding up your Bot
So we have already sent our Bot to our Discord Server. But it doesn’t have any functionality now. You have to code it by yourself. Follow the below-mentioned points to successfully code your bot.
- Create a new folder named ‘BOT’ on your Computer.
- Now create 3 files in this folder.
- Name the first file “auth.json” and copy paste the below lines in it.
{
“token”: “Your Bot Token”
}
- Replace the “Your bot Token” with the Authorization token you copied before in Step 2.
- Create another file named “Package.json” in our BOT folder.
- Copy paste the below code in it. Change the names, description, and Author as per your preference.
{
“name”: “MySmartBot”,
“version”: “1.0.0”,
“description”: “This is my First Discord Bot”,
“main”: “bot.js”,
“author”: “Your Name”,
“dependencies”: {}
}
- Create another new file named ‘bot.js’ and copy paste the below code without changing anything.
var Discord = require('discord.io');
var logger = require('winston');
var auth = require('./auth.json');
// Configure logger settings
logger.remove(logger.transports.Console);
logger.add(new logger.transports.Console, {
	colorize: true
});
logger.level = 'debug';
// Initialize Discord Bot
var bot = new Discord.Client({
	token: auth.token,
	autorun: true
});
bot.on('ready', function (evt) {
	logger.info('Connected');
	logger.info('Logged in as: ');
	logger.info(bot.username + ' - (' + bot.id + ')');
});
bot.on('message', function (user, userID, channelID, message, evt) {
	// Our bot needs to know if it will execute a command
	// It will listen for messages that will start with `!`
	if (message.substring(0, 1) == '!') {
		var args = message.substring(1).split(' ');
		var cmd = args[0];
		args = args.splice(1);
		switch(cmd) {
			// !ping
			case 'ping':
			bot.sendMessage({
			to: channelID,
			message: 'Pong!'
			});
			break;
			// Just add any case commands if you want to..
		}
	}
})
That’s it. Only one step and you will have your own very first Discord bot. If you have any knowledge of Javascript you can easily understand what is the functionality of your bot. If you don’t know anything about coding, just copy paste the entire thing and wait and watch.
Another Article you might Like:- How to Install & Watch Kodi On Roku
Step 5:- Installing Dependencies and running the Bot
All you have to do now is install the dependencies of your bot in the BOT folder and run your bot on your Discord server. Let us see how to install dependencies using cmd on your Computer.
- Open cmd from the Start Menu.
- Navigate to your BOT folder using the change directory (cd) command.
- Type “npm install discord.io winston –save.” in the cmd and hit Enter.
- Now type “npm install https://github.com/woor/discord.io/tarball/gateway_v6” and hit Enter again.
- You have installed all the files required by your bot to run.
- Type “node bot.js” on cmd and hit Enter.
- Open your Discord account and head to the bot.
- Type intro or whatever the action word you set in your bot.js file.
Hurray! you have successfully completed all the steps required to set up and test your bot. You can now find your Bot on the side Menu of Connected Users. Type intro or whatever the action word you have changed in the bot.js file (intro at default) and press Enter.
You might also like this:- OBS vs Xsplit: Best Streaming Software Comparison
So that’s it. We are finally at the end of our Article. All these are the steps to create your own Discord bot on your Discord server. Yes, these steps are a bit complicated and lengthy. I have done my best to make you understand all the steps. If you stuck anywhere or have any doubt/queries regarding any steps from above. Feel free to tell us in the Comments section below. I’ll be happy to assist you. So I believe now you don’t have to look anywhere to know “How to make a Discord bot” on the Internet.


