Google Chrome is undoubtedly the most used web browser owing to the millions of its users. And if you too have Google Chrome set as your default browser, then you might have come across the Chrome class not registered error one time or another. All kinds of errors are annoying, as sometimes we know its cause and sometimes we are totally unaware of the reason leading to it. This Google Chrome related error is mostly related to the registry files and thus when these files mess up, you will observe the error. The users of Windows 10 and 8 are complaining about the issue and so today we will be discussing here some methods by which you can fix the Class not Registered error.
Google Chrome Class not Registered Error
Just like every other uninvited problem of life, it is possible that one day out of nowhere you face this annoying error related to Google Chrome. And so whenever you click on the icon of this program a pop-up window will display on your screen saying that the Chrome Class is not Registered.
Usually, this might happen due to some virus attack or the malware tool that your system runs to clean up. Actually, the anti-virus either modifies the DLL files or re-writes the registry files of your computer. Though after cleaning up, it tries to restore the files if it cannot then it deletes the files permanently.
Check This: Full Screen For Google Chrome – How To Activate It?
How to Fix Chrome Class not Registered Error
As sometimes we do not know the reason behind the error, we are providing you with some methods which help you resolve the issue permanently. The error is common for all platforms and therefore the given below methods can be applied by users of Windows 7/8/10.
1. Delete Registry Keys to Fix Class not Registered Error
The first method has worked for many of the users. It needs you to delete some of the registry keys, as registry files are one of the main cause of this error. If you do not know how to clean up the registry file of your system, then follow the given step-by-step guide and know how to delete the registry keys.
You can complete the process in two ways. The first method is completed through the command prompt while the other one can be completed through the registry editor. Let us begin with the command prompt method.
Step 1: Press the Windows key and then in the search box enter “cmd”. Now press Ctrl+ Shift+ Enter together.
Step 2: In the pop-up box of User Control, press OK. You will be provided with the Administrative privileges.
Step 3: Now in the command prompt, either type or paste the following commands one after the other and then hit the enter key.
REG DELETE HKEY_CLASSES_ROOT\Chrome
REG DELETE HKLM\Software\Classes\Chrome
REG DELETE HKCU\Software\Classes\Chrome
REG DELETE HKLM\Software\Classes\ChromeHTML\open\command\DelegateExecute
REG DELETE HKCU\Software\Classes\ChromeHTML\open\command\DelegateExecute
Step 4: The process completes here. Now restart the computer to apply the changes made.
You can also complete the process with the registry editor. This process is quite easy as you just have to delete the registry entries. Follow the instructions given below-
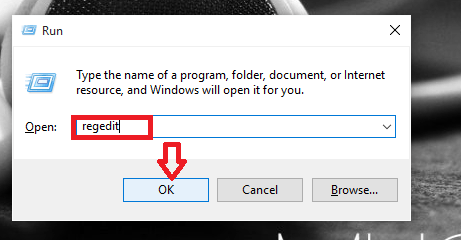
Step 1: Press the windows icon key+ R simultaneously. And then in the command field type- “regedit.”
Step 2: You will be directed to the registry editor. Here locate and delete all the following keys.
HKEY_CLASSES_ROOT\Chrome
HKLM\Software\Classes\Chrome (all of it)
HKCU\Software\Classes\Chrome (all of it)
HKLM\Software\Classes\ChromeHTML\open\command\DelegateExecute
HKCU\Software\Classes\ChromeHTML\open\command\DelegateExecute
Step 3: After you delete all the keys, restart your computer. This is necessary for the application of the changes.
2. Fix by Re-registering all DLL Files
According to some of the users, re-registering the DLL files has also helped to resolve this Google Chrome class not registered error in Windows 10, 8.1, 8 and 7. Sometimes the DLL files cause this error. And so if you are wondering how to fix Chrome Class not Registered error, then you try to re-register all the DLL files of your system.
Step 1: Open the Command Prompt on the affected device. Press windows icon key +X together.
Step 2: After the command window opens, type the following command.
FOR /R C:\ %G IN (*.dll) DO “%systemroot%\system32\regsvr32.exe” /s “%G”
That’s it. Now while this process takes place, you might face some runtime error. Also when the registration process of DLL files is going on, your system might get slow. But once you notice that the all the DLL files have been re-registered, you can restart your system.
3. Directly Launch Google Chrome using BAT File
If the above two solution doesn’t work, then you can try to fix this Class not Registered error using this method. In this process, you need to create a batch file, and you will be able to open your Google Chrome browser without any kind of error.
Step 1: Open any text editor, as preferred by you. It is advised that you use Notepad.
Step 2: Then write the given below command in the Notepad file.
start /d “C”\Program Files (x86)\Google\Chrome\application\” chrome.exe
In the above command, change the location of Chrome file if you are installing it in a different location other than the default – C drive. Change the file path to the current one.
Step 3: Rename the file and save it with the .bat extension like chrome.bat. Now you can open the web browser by double-clicking on this file instead of the shortcut made at the time of installation.
Another trick to bypass this Chrome error is to remove the existing file and create a shortcut. A few of the steps to do so is similar to the above process. Let’s see how you can do this.
Step 1: Find the Chrome’s .exe file by navigating to the following location.
C:\Program Files (x86)\Google\Chrome\Application
Step 2: Now to create a shortcut, right click on the .exe file. Now select Create shortcut option.
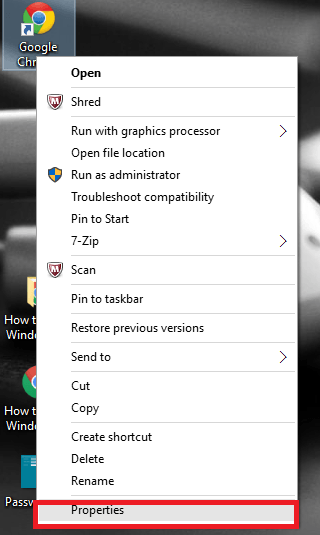
Step 3: Next right click on the new shortcut icon. And then choose Properties.
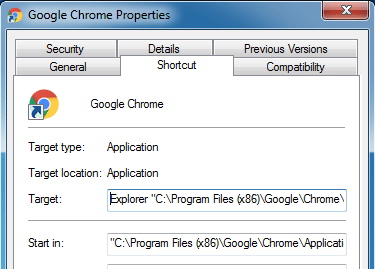
Step 4: In the target path option, add the following as a prefix- C:\Windows\explorer.exe
Step 5: Next click on Apply to save the changes and then press OK.
Lastly, pin the icon to the taskbar by dragging and dropping it. Now you can run the web browser without the interruption of any kind of error.
Also Read: Best Chrome Cleanup Tool
These were 3 methods that you can use to fix the Chrome Class not Registered error either temporarily or permanently. We hope that this was of help to you. If you have any other troubleshoot for this error, then share with us in the comment section below.


