Whether to enable or disable the Superfetch service, previously known as Prefetch is a disputable topic. The Prefetch technology of Microsoft Windows is known as Superfetch, since Windows Vista. While you need to disable the Superfetch services for the apps related to gaming and video editing, the business apps are benefited when you enable them.
Both Prefetch and Superfetch are meant to improve the responsiveness of your system. But since the performance of the heavy software and the gaming apps is hindered, it is appropriate that you disable these services in Windows. And so for those who are wondering how to disable Superfetch and Prefetch in Windows 7, 8, 8.1, 10, you are on the right page.
We are sharing here some useful information about these services and how to disable Superfetch and Prefetch in Windows 7,8,10. So let’s get started.
What is Prefetch & Superfetch in Windows 7, 8, 10?
The Prefetch and Superfetch services predict about the applications that a user is likely to use. And then it loads up the memory of the system with the necessary data. This preemptive action is the main function of Superfetch and Prefetch service. But the system with solid state drives doesn’t benefit from them. And so the writes seems unnecessary and detrimental for the solid state dives in the long run. The issue was addressed by Microsoft, in Windows 7 as they enabled the service to disable Superfetch and Prefetch whenever it detects a fast SSD. While in Windows 8 the OS analyzes the state and disable the Superfetch or Prefetch service on its own.
And so it might be a bit confusing, whether to allow Windows to disable it automatically or do it yourself when needed. And so if the power users want to manually disable or enable it, here is the complete guide of how to disable Superfetch and Prefetch in Windows 7, 8, 10.
How to Disable Superfetch and Prefetch in Windows 7, 8, 10?
Now if you want to know how to disable Superfetch and Prefetch in Windows 10 as it is the latest version then you must know that the process is same for all the Windows versions. Here we sharing different methods to separately disable the Prefetch and Superfetch services.
Steps to Easily Disable Superfetch in Windows 7,8, 10
You can manually disable Superfetch in Windows 7, 8 or 10. For this, you will have to launch the SysMain Service of Windows. The Services Manager of Windows is related to the Superfetch services. And it only manages and improves the performance of the system. You will find this in the System32 folder. Follow the given steps-
Step 1: Open the Run Window by either pressing the Windows icon key +R or right click on the Windows Start option. And then choose Run.
Step 2: In the “run” window that will open, type- “services.msc.” You can also search “services.msc” directly from the desktop.
Step 3: A new window of Service Manager will open. Scroll down to locate Superfetch.
Step 4: Open the Properties of Superfetch by double-clicking on it.
Step 5: After you launch the Properties window, click on stop option to stop the Superfetch services.
By performing the above step, you will kill the service for time being. And so it will start automatically, the next time you boot your system. And so you will have to instruct your system accordingly and disable Superfetch and Prefetch in Windows 10.
Step 6: On the same Properties window, you will observe “Startup Type” option set to “Automatic.” In this option, select “Disabled” from the drop down list.
Step 7: Now click on Apply to apply the changes and then hit the OK option.
This is how you can disable Superfetch in Windows 7, 8, 10 manually through the Service Manager. Reboot your system after closing the Service Manager and observe the change taking place.
Steps to Easily Disable Prefetch in Windows 7, 8, 10
You can also disable Prefetch in Windows 7, 8 or 10 through the Windows Registry, just like you disabled Superfetch services. Follow the given steps of Registry Editor Method.
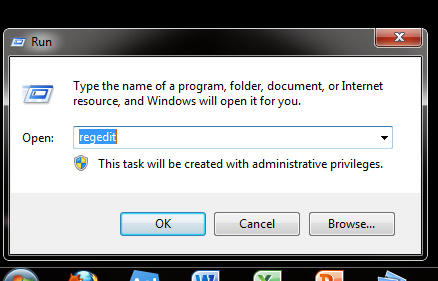
Step 1: Open the Run window and type- “regedit” to launch the Registry Editor.
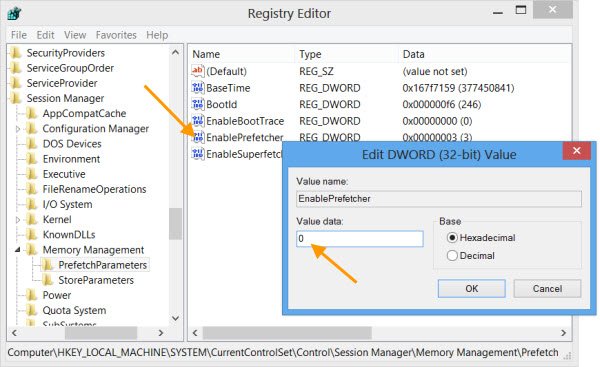
Step 2: Now in the Registry, navigate to the following location.
HKEY_LOCAL_MACHINE\SYSTEM\CurrentControlSet\Control\SessionManager\MemoryManagement\PrefetchParameters
Step 3: “Enable Superfetch” by double clicking on the right side. If you cannot find this value, then follow the given steps to configure Prefetch values.
Step 4: Locate the PrefetchParameters” and right click on it. Then select “New” and click on DWORD Value.
Step 5: Assign the “Enablesuperfetch”, any one of the given values-
0- Disables Prefetch
1- Enables Prefetch only when any application is running
2- Enables Prefetch for the files that you can boot
3- Enables Prefetch for both applications and boot files
The default value of your system will be set to the value “3” and so set it to the “0” value so as to disable Prefetch.
Setting the Superfetch and Prefetch values can incorrectly increase the application launch and boot time. And so if you are not able to understand the method, do not adjust the settings of the Superfetch and Prefetch services. While the advanced users running on non-standard drive configurations or on virtual machines can use these methods and fix the issue manually.
So guys, if you too are facing some problems like a slow running system, then you can try to disable Superfetch and Prefetch in Windows 7, 8, 10. The process to disable these services is same in the entire Windows version. We hope that this article was of help to you.


