Just like technology is paving its way into our lives, various errors related to it are becoming an everyday issue for us. We have faced the various types of Blue screen of Death error, and today in this post we are talking about one of its kind. The Page_Fault_In_NonPaged_Area error is a type of BSOD that is prevalent from the time of Windows XP. And now Windows 10 users are also facing the same issue.
Usually, you face this error when your system is trying to find some data, and when it couldn’t find it, it starts rebooting your device. And so keep reading to know more about the error, what causes it and how to fix Page Fault In NonPaged Area in Windows 10.
Check another Windows Fix: WSAPPX High CPU Usage Error Issue: What Is It and How to Fix It?
What is Page_Fault_In_NonPaged_Area Error?
The blue screen of death 0x50 error displays on your screen when a certain application tries to access some part of the physical memory of your system. This step is invalid either when it is reserved for someone else or when that data is in use by some other application. And so the system automatically shuts down to prevent any further damage.
You can recognize this error when you system sluggishly runs and responds to keyboard or mouse input. Or when your system crashes while running the same program or freezes for a few seconds.
There are many reasons that cause this error but if you happen to be lucky enough then the syntax will display the cause of the issue itself. Before we move on to the ways to troubleshoot the error, let us have a quick look at the possible causes-
- Corrupted, incorrectly configured or old device drivers.
- Corrupt windows system files due to Virus or malware attack.
- Due to the software change, the Windows registry might get corrupted.
- After the installation of a new driver, there can be driver conflicts.
- A damaged hard disk can also lead to the 0x50 blue screen of death error.
- Lastly, corruption in memory (RAM) also causes the error.
How to Fix Page_Fault_In_NonPaged_Area Error?
There are various ways by which you can bug check the 0x50 error (Fix Page_Fault_In_NonPaged_Area) displayed on your screen. Here are some troubleshooting steps that you can try. These solutions might get complicated and time-consuming, so try to recognize the cause of the error before making the safety move.
Fix Page_Fault_In_NonPaged_Area by Recreating the Page File
Your hard disk’s space might be getting used up by the Windows so as to speed up your computer or laptop. And so to fulfill the process a page file is created by it, to which the system refers for speedy access. And so by disabling this page file, you can fix the issue.
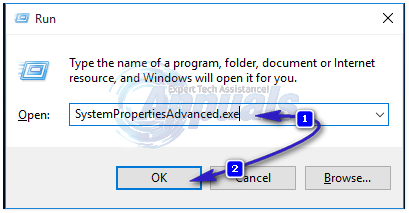
Step 1: First you need to open the Run dialog box. For that press Windows icon key +R simultaneously.
Step 2: Type “SystemPropertiesAdvanced.exe” in the box. And hit enter.
Step 3: In the System Properties window, click on Advanced tab. Then select Settings within the Performance option.
Step 4: A new dialog box will open. Click on Advanced again and then click on the checkbox against the “automatically manage paging file size for all drivers.”
Step 5: Then select the No Paging file and hit the Set button.
Step 6: you will get a number of warning messages. Just click on the OK option. Now close all the windows and restart your system.
Repair the Registry Entries to Fix Page_Fault_In_NonPaged_Area Windows error
Repairing the registry errors you can not only fix these errors but also boost the performance and speed of your system. You can complete this process either by using the registry cleaner or manually repairing it. Follow the given steps of creating a backup of the registry associated with the error. After this, you can manually edit the registry.
Step 1: Click on Start. Type “command” in the search box.
Step 2: Now press Ctrl +Shift simultaneously. Hit the enter tab.
Step 3: Now in the permission dialog box, press the Yes tab.
Step 4: In the new command box, type “regedit” and press enter.
Step 5: The Registry Editor window will open. Here you need to select the key related to error 0x50, that you need to back up.
Step 6: Now select Export from the File menu.
Step 7: To save the backup key of Windows Operating System, select the folder in the Save In list.
Step 8: Give a new name to your backup file. Also, make sure that you have chosen Selected Branch in the Export Range box.
Step 9: Now click on save. The file will be saved with .reg file extension.
That’s it. You now have a backup of the error related registry entry following which you can edit the registry details manually.
Run System Restore to Fix
The System Restore in Windows allows you to time travel and undo the changes that you have made. All your PC’s programs and system files will return back to normal working. And so with this solution, you can save yourself from time and hard work of troubleshooting the Page Fault in NonPaged Area 0x50 error. Follow the given steps-
Step 1: Hit the Start button. And in the search box, type System Restore and press enter.
Step 2: Select System Restore from the list of results displayed.
Step 3: You will get a prompt message to enter a password. Here enter the administrator’s password.
Step 4: Next follow the on-screen instructions that get displayed in the Wizard window and select to restore point.
Step 5: Now restore your system.
This solution is a sure shot solution to fix the error in all version of Windows from XP, Vista, 7, 8 to 10.
Run Disk cleanup to Fix Page_Fault_In_NonPaged_Area in Windows 10, 8, XP
Disk Cleanup is very common method to solve any kind of error that relates to hardware and software. As we know while surfing the net a lot of junk files accumulate in our system. And eventually, these files cause our Windows Operating System to run slowly. And so be cleaning up these overloaded hard drives you can fix Page_Fault_In_NonPaged_Area windows 10 error.
Step 1: Open the Start window. Then enter “command” in the search box, but do not hit enter.
Step 2: Now by pressing Ctrl +Shift, hit the enter tab.
Step 3: A permission dialog box will prompt on your screen. Click on Yes to give permission.
Step 4: A black window will appear with a blinking cursor. Type “cleanmgr” and then press enter.
Step 5: The amount of disk space that you can reclaim will be calculated by Disk Cleanup.
Step 6: You will see a new window of Disk Cleanup with a lot of check boxes that you can select. Usually “Temporary Files” occupy most of your disk space.
Step 7: Now select the categories that you want to clean and then press OK.
Check for a Faulty RAM
This error commonly associates with a faulty RAM or its connection to the motherboard is at fault. And so to resolve the error, test the RAM.
Step 1: Download Memtest86+.
Step 2: After downloading put it on a USB flash. Or you can burn it to a disk.
Step 3: Also make sure that in BIOS the USB or the CD ROM is set as the first boot device.
Step 4: Keep the USB or CD inserted. And then restart your system.
Step 5: Now you can start testing the RAM memory of your system by opening Memtest86+. The process will complete within 10 to 30 minutes. If you don’t get some error then it means that your RAM is efficient.
These were some of the various troubleshooting ways to fix the blue screen of death 0x50 error also called as Page_Fault_In_NonPaged_Area error. We hope that they would be of some help to you.


