The introduction of new and latest version of Windows operating system gives its users the opportunity to enjoy some advanced features. But nevertheless, each time new OS comes in the market it brings with it a few issues. These issues are in the form of error messages that interrupt you doing work on PC. With the more users using Windows 10 OS the issue of Blue screen of Death error with Unexpected Store Exception is getting common.
It is a really annoying error as the Windows 10 freezes or crashes the screen. The Windows Unexpected Store Exception error basically comes when you upgrade your computer to the latest Windows 10 OS. You come to know about the error when while working the running programs on your computer crash and present you with a Dreaded blue screen of death (BSOD).
So if you are also frustrated with the screen getting crashed while doing your important work with Windows 10 then the methods mentioned here will help you resolve the Unexpected Store Exception error.
Check another Windows Fix: WSAPPX High CPU Usage Error Issue: What Is It and How to Fix It?
Causes of Unexpected Store Exception Windows 10
Since this is an unexpected error the causes are generally associated with Windows store. So let’s have a look at the reasons why BSOD happens.
- Damaged/outdated system drivers.
- Pending updates.
- Corrupt system files.
- Bad sectors on the hard disk.
- The installed anti-virus program.
- Fast startup routine.
- Acute virus/malware infection.
Check this post: 10 Best Driver Updater for Free
How to Fix Unexpected Store Exception BSOD Error
There are several ways in which you can resolve the Unexpected_Store_Exception Blue screen of death error. So wait no more and begin following the steps as mentioned to get rid of the irritating error.
1. Perform a Clean boot to Fix Unexpected Store Exception Error
The first method that you can try is performing the clean boot of your Windows system. This will get you rid of all the bugs and corrupted files.
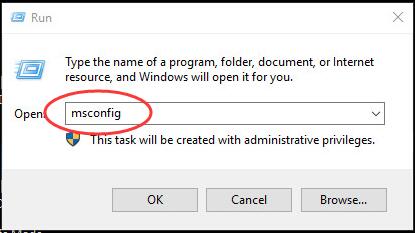
Step 1- Press Windows icon and then hit the R button. This will open the Run box.
Step 2- Type msconfig in the Run box. Now hit Enter to open System Configuration window.
Step 3- Choose to view on service pane. From the options chose to hide all Microsoft services. Click on disable all.
Step 4- Now go to the Start Pane. From there click on open task manager.
Step 5- Once you have open the Task Manager window, hit on Startup pane. Then highlight the unnecessary services except for Windows safe services. Finally, click on disable all.
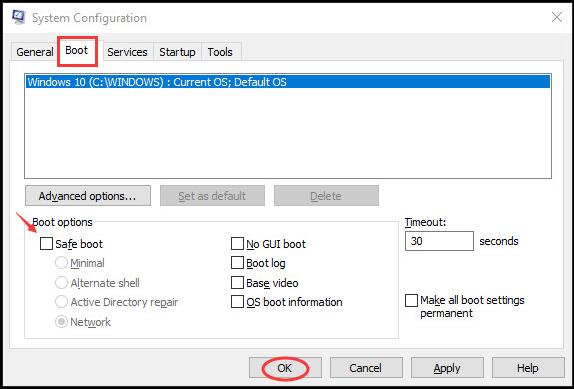
Step 6- Now close the Task Manager Window and back on Services Configuration window. Click on the tap on Boot pane. Then uncheck on Safe boot and click OK.
Step 7- Once you are prompted by System Configuration. Click on Restart.
If this method does not work for you then you have another method to try out here.
2. Uninstall Antivirus Program
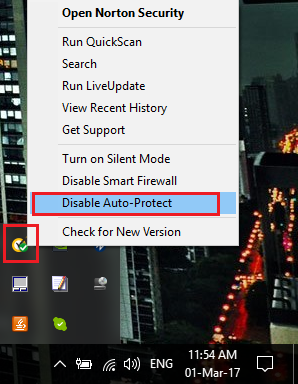
Windows 10 OS has Microsoft Defender software by default. This is powerful security software that needs no installation of any other security software. So it is advised to uninstall third-party security software for it may be causing file conflicts hence leading to the error. To do so follow the steps-
Step 1- Press Win + X keys simultaneously to open Startup menu. Now Select the “Control Panel”.
Step 3- Click on the “Programs” in the control panel.
Step 4- Find the third-party security software that you might have installed. Search form the resultant programs list. Then right-click on it before selecting it to uninstall.
Step 5- Now restart your computer and try re-launching the different programs to see whether your installed Antivirus program was causing the error for you.
Well, these steps can be followed in just a few minutes and you will be far away from the error.
3. Run System File Checker
Running the built-in system file checker tool can also be considered to resolve the error. This tool scans and tries to repair the corrupt files that may be leading to the error.
Step 1. Click on the “Start” panel.
Step 2. Then type “cmd” in the “Search programs and files” window.
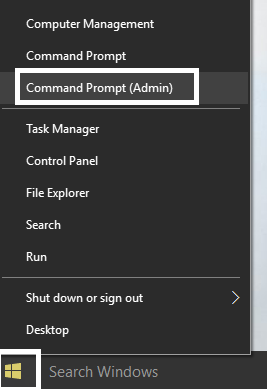
Step 3. Press the combination of CTRL + Shift + Enter before clicking “OK”. This will open a command prompt window. You can also simply Press Win + X keys. Then click on Command Prompt (Admin).
Step 4. Type the command as “sfc /scannow” into the prompt window. Then hit Enter.
Step 5. Now, wait as the process will take some time to check system files. It will also replace them if found corrupted.
Once the scanning is completed it will show if any corrupted files were found and they are fixed. Now restart your system and your error will be fixed.
4. Run Disc Check Utility
Bad sectors on the disk hosting the OS can also cause the death of screen error. So run the built-in disk check to see if your error gets resolves or not.
Step 1. Press the combination of Win + X keys. This will open up the menu bar.
Step 2- Now select “Command Prompt (Admin)” option.
Step 3. Click “Yes”. This will run the command prompt as an administrator.
Step 4- Enter the command “chkdsk”. Here you need to leave space after the “chkdsk” before typing in the drive letter (C).
Step 5- Now type the command into the prompt as “/f/r/x”.
Step 6- Finally hit the enter button.
Now simply restart your PC to make sure you have got rid of the error.
5. Update Drivers via Device Manager
Drivers are essential components of your PC as they facilitate the communication between the system and the installed programs and applications. So check if any drivers are damaged or if they need to be updated.
Step 1- Right-click on “My Computer”. Then select “Properties”.
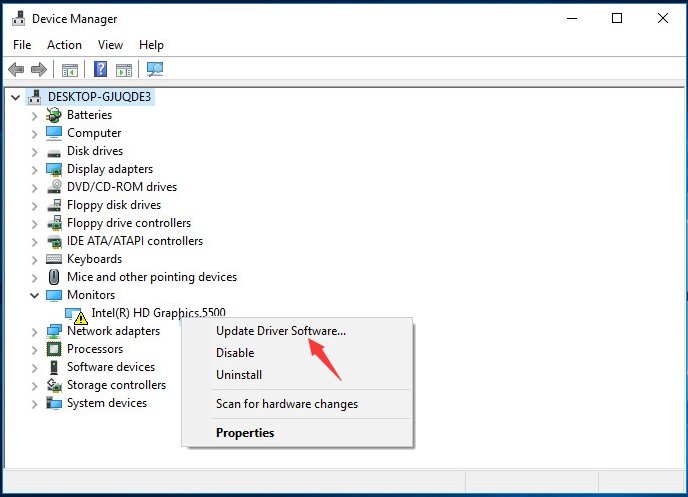
Step 2- Now select “Device Manager”. Navigate through all the devices and look out for any device with a yellow exclamation mark.
Step 3- Right-click on any such device. Now choose the option of “Update Driver”.
Step 4- Restart your computer after it gets updated.
Now check if you are still prompted with the same error.
6. Check for Windows App Updates
Since this error is linked to Windows Store, you need to ensure that all Windows apps installed on your computer are updated and working properly.
Step 1. Go to Startup Menu. Launch Store.
Step 2. Click on the user icon.
Step 3. Click on “Settings” icon in the resultant menu.
Step 4. Toggle “Update apps automatically”.
Or else you can also go for the option that says Check for the available updates to see if any available.
Also Read: Fix Windows Update Error
7. Restore Windows 10 to Fix Unexpected Store Exception Error
You can restore the system to remove the programs that cause the Unexpected Store Exception on Windows 10.
Step 1. Open the System option on your Windows PC.
Step 2. Select System Protection. It will be mentioned on the left side.
Step 3. Choose System Protection tab.
Step 4. Now click on the System Restore button. Then click on Next.
Step 5- Choose the desired system restore point that you have created before. Again click Next.
Step 6- Now follow the on-screen instructions. Finally, click on finish.
And you are done as you will no longer be able to see the error.
Well, this was all about the solutions that are worth trying for resolving the Unexpected Store Exception error. I hope this article will help you best as all the provided methods are genuine and accurate. For any doubts, you can write to us as we will be happy to help you.

