Windows 10 continues breaking all the records and runs more than 1.3 billion devices worldwide. Yet, far not all users know and use all the hidden functions of their software. One of the most advantageous benefits of it is the Windows 10 screen recorder.
The Game Bar is a Screen Recorder for Windows 10 that can capture your screen without any need to use a third-party recording application and make the screen recording a lot more convenient for you.
About Built-In Screen Recorder for Windows 10
The Record screen Windows 10 tool is a part of the Xbox Game Bar. Even though the name of this instrument talks about a playing feature, the Game Bar can be used outside gaming as well.
Microsoft still names it the “Game Bar,” but it can be considered inaccurate now. It has developed into an overlay with different panels and is not simply a bar.
To access this screen recorder, you should go to Game Bar’s feature “Widget Menu” and find a “Capture “ widget. You need to have Windows 10’s May 2019 update or a more recent version of the OS to use the Widget menu.
How to Open a Windows 10 Screen Recorder
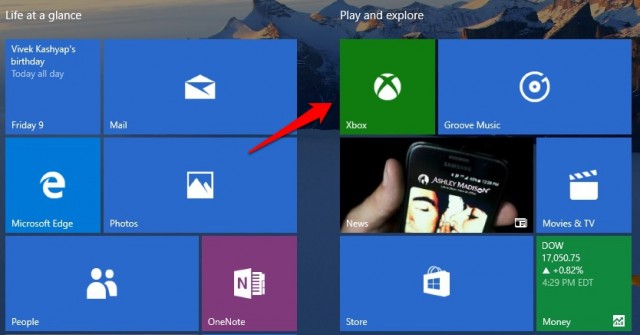
You need to press Windows+G to start the Game Bar. In another way, you can click the Start menu and open the “Xbox Game Bar” app.
If you can’t see the overlay Game bar application, go to Settings>Gaming>Xbox Game Bar and make sure that the Game Bar is “On” there. You also have an opportunity to alter the keyboard shortcuts – you can change an “Open Game Bar” to any other combination you like instead of Windows+G.
To find a screen recorder in the Game Bar overlay screen, press the Widget menu icon. It is situated on the left side and looks like a few lines with bullet points.
You need to click “Capture” on the drop-down list, or it can also be located in the toolbar.
How to Start Recording Your Screen
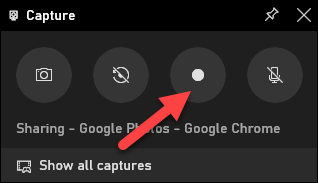
When you look at the “Capture” widget overlay, you will find four buttons on the Capture widget:
- Screenshot: Takes a screenshot of an opened window.
- Record last 30 seconds: Makes the recording of the past 30 seconds.
- Start recording: Records the operating window.
- Turn on the mic while recording: When you turn on this option, the program records the sound from your computer’s microphone.
Under these four buttons, you will see the text. It tells you what the active window, which is being recorded, is. Before you start the recording, you have to make up your mind if you want to use your microphone for the recording, which is a handy tool when you aim to describe and clarify something on the screen recording.
After it, you can click the Start Recording button, and the recording will begin.
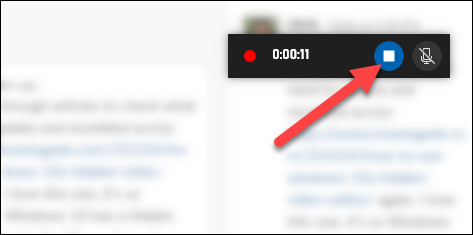
During the recording process, a small toolbar with the time of recording and the buttons to stop recording and switch on/off your microphone will show in the corner of the screen.
When you are done, don’t forget to click the Stop button to finish the recording.
To see your recording, click “Show All Recordings” on the Capture widget. Besides there, all your recordings are saved in folder C:\Users\NAME\Videos\Captures.
The Game Bar is a perfect tool for capturing your screen in Windows 10. But what can the users of Macbooks do?
Additional Useful Features of the Game Bar
The Game Bar is not simply a great screen recorder for Windows 10. Still, it is also full of other convenient features, among which the panels for adjusting application volume, playing Spotify music, and others.
Adjusting Application Volume
Everyone, not only gamers, will enjoy this advantageous feature of the Game Bar. You can press Windows+G and adjust the volume of any opened application in the Audio panel.
Controlling System Performance
The Game Bar provides the tool for managing your CPU (Central Processing Unit), GPU (Graphics Processing Unit), and RAM (Random Access Memory) usage. When you press Windows+G while playing the game, this information will pop up in the tab.
Playing Music From Spotify
The Game Bar supports the Spotify integration now. You need to select the Spotify button on your menu panel, sign in to your Spotify account, and you will be able to enjoy listening to music while using the Game bar.
Chatting on Xbox
The Game Bar was created as an Xbox tool, so Xbox branding goes on here. The updated interface offers an “Xbox Social” widget, from where you can text your Xbox friends live.
How to Make a Screen Recording on Mac
Many Windows users struggle when they switch to Apple computers because they are not aware of many of their functions. So in this article, we also want to explain some ways of making a screen recording on Mac:
Using the Screenshot Toolbar
When you want to see the Screenshot Toolbar, you have to click three keys simultaneously: Shift, Command, and 5. On the screen, you will see controls for recording the entire screen, a part of your screen, or capturing an image of your screen. You have to choose the option that caters to your needs.
Using QuickTime Player
QuickTime is a specially created framework by Apple Inc, which supports different formats of videos, pictures, sounds, interactivity, and can provide screen recordings on your Mac devices. It is installed on most Macbooks by default.
Conclusion
Making a video recording is a crucial feature in today’s world of working, studying, and interacting with people online.
The Game Bar is a popular tool that provides multiple advantages for users who play games. It allows them to chat on Xbox, adjust the volume of active applications while playing the game, or listen to music from Spotify.
One of the handiest features, screen recording on Windows 10 through the Game bar, is not familiar for most Windows 10 users. Now you know about this feature and can start using it!

