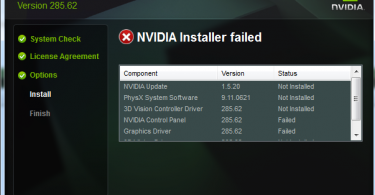
If you have recently installed a new hardware or software then the conflict between your drivers and Windows may trouble you. If you are Windows 10 user then you might have frequently come across the error asking you to fix Video Scheduler Internal Error. The Video Scheduler Internal Error in Windows 10 (or even other windows versions) is basically a Blue screen of Death error that indicates the fatal violation by video scheduler. The error is mostly due to the Graphics card and its driver’s issue that has a stop error code 0x00000119.
When the VIDEO_SCHEDULER_INTERNAL_ERROR appears on the PC, the screen freezes and hence frustrating the users. The error can occur anytime while you are doing some important work or watching a movie.
The display screen also crashes and you have to repeatedly restart your PC. Well, every problem has a solution and this problem of video scheduler internal that appears in Windows 10 has easy fixes.
Causes of Video Scheduler Internal Error
The Blue screen death error can be caused due to various reasons as follows-
- Incorrectly configured, old, or corrupted device drivers.
- Corruption in Windows registry due to a recent software change.
- Virus or malware infection that has corrupted Windows system files or other System-related program files.
- Driver conflict after installation of new hardware.
- Damaged or removed system files after you have installed software or drivers
- Error 0x119 blue screen caused by a damaged hard disk
- Error may also occur due to RAM corruption
Fix Video scheduler Internal Error
There are certain ways in which you can try to fix of blue death screen error that interrupts you while performing your daily tasks.
You can find 7 different methods by which you can fix Video Scheduler Internal Error. Using the steps provided, you can easily solve the error completely without the need to buy any hardware or software.
Let’s begin.
Run System File Checker (SFC) and Check Disk (CHKDSK)
The first method that is likely to get you success fixing the Video Scheduler internal fault is by checking the corrupt files or faulty hard drives. So get an easy fix follow the steps mention-
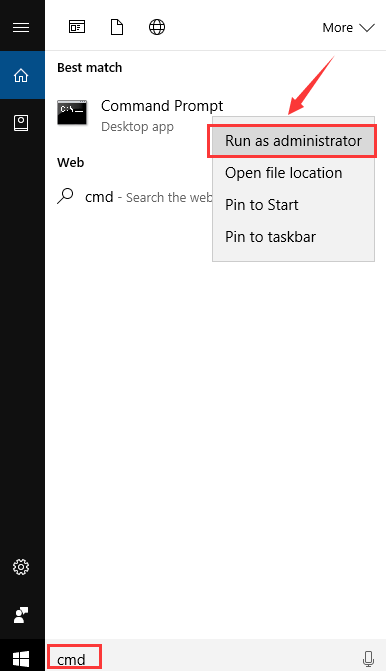
Step 1- On your keyboard, press the Windows key. Or type cmd. Then right-click on Command Prompt. Now click Run as administrator.
Step 2- You will be prompted with permission dialog box. Now click on Yes.
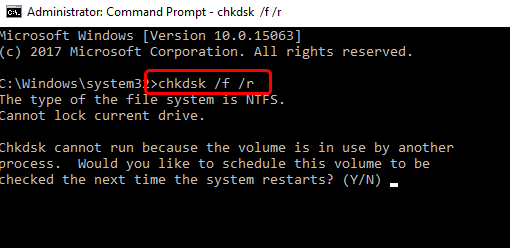
Step 3- Now type chkdsk /f /r, then hit the Enter key.
Step 4- Press Y on your Keyboard.
Step 5- Now restart your PC to allow Windows to perform a hard disk check.
Step 6- Now again click on Windows logo to get command prompt window. Click on Run as administrator.
Step 7- Type the command sfc /scannow and press the Enter button.
Step 8- Wait for a while till system File Checker will begin scanning for Error 0x119.
Step 9- If there are no faults then follow the on-screen commands.
Once you are done you will no longer face the error.
Update all Available Windows updates to Fix Scheduler Error
The next method that you can give a try is searching if any of the Windows updates are left to be updated.
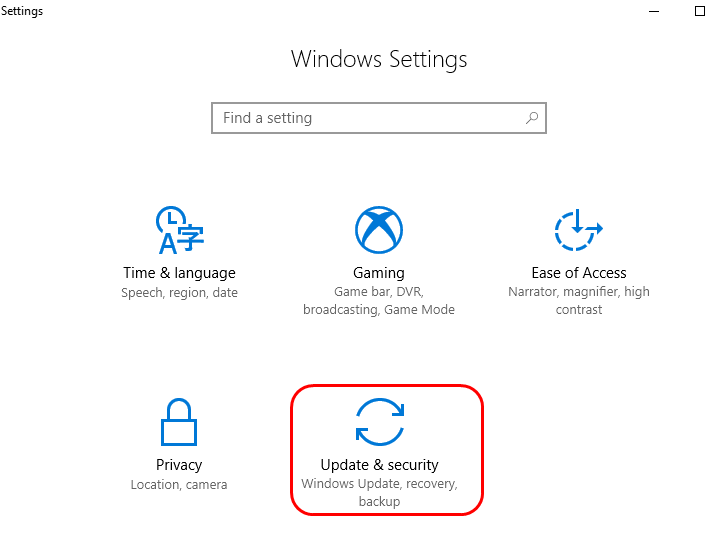
Step 1- Hit the Windows logo. Then click option of Updates and Security.
Step 2- In next step click on Check for updates.
Step 3- The Windows dialog box will appear.
Step 4- If any updates are available then click on Install updates.
This easiest method will also help you get the solution to your error.
Run DISM to fix Video_Scheduler_Internal_Error
To check out if this method works to your error then follow the given steps-
Step 1- Click on Windows Key + X. Select Command prompt run as administrator option.
Step 2- Type in the commands as given-
Dism /Online /Cleanup-Image /StartComponentCleanup
Dism /Online /Cleanup-Image /RestoreHealth
Step 3- Simply reboot your PC to save all the changes or settings.
Reinstall Faulty Drivers to Solve the Problem
Faulty drivers can also be the cause of this error so to make sure your system is free of faulty drivers then you can navigate through these steps
Step 1- Press Windows and X at the same time. Then click on Device Manager.
Step 2- Now click on Scan for Hardware changes.
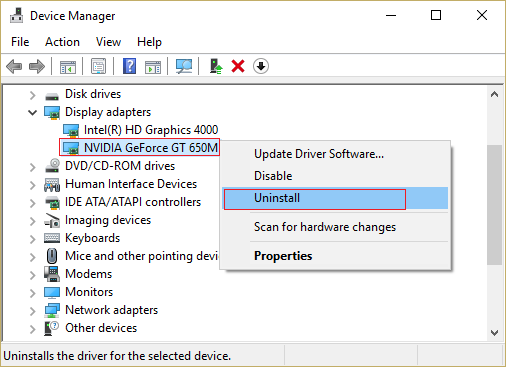
Step 3- Now search for the device driver that has a yellow exclamation or question mark. Right click on such driver and click on Uninstall.
Step 4- A confirmation window will appear. Click on Yes to confirm.
Step 5- Lastly search on the support website for the same driver and then download install it again manually.
Once you are done with it have a look your problem will be resolved.
Uninstall Graphic Card Driver
Another method that you can give a shot is uninstalling the graphics card driver.
Step 1- Under device manager right-click on your NVIDIA graphic card. Select Uninstall.
Step 2- A confirmation box will appear. Click on yes.
Step 3- Go to Control panel by pressing Windows key + X.
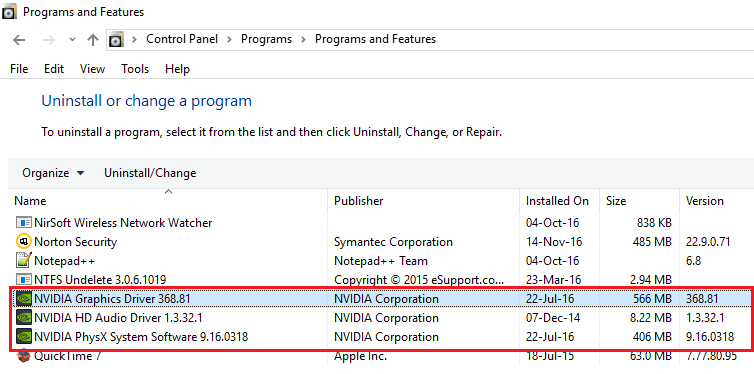
Step 4- From control panel select Uninstall a Program
Step 5- In next step click to uninstall anything that is related to NVIDIA graphics.
Step 6- Restart your PC. Now again download the setup or the drivers that you recently uninstalled from the website.
With just a few steps and little efforts, you are done.
Run Disc Clean up to Fix BSOD Error
Sometimes because of the Windows Disc clean up tools, this error appears in some of your temporary files. So to resolve the error follow the steps-
Step 1- Click on the Start button. Then click on the search box.
Step 2- In the search box type Command.
Step 3- Hold CTLR and shift button together. Now hit enter.
Step 4- You will be prompted with the dialog box. Click Yes.
Step 5- You will get a black box with a blinking cursor.
Step 6- Type “cleanmgr” and hit Enter.
Step 7- Disc cleanup will begin now. The disc clean up box will appear with the check boxes that you can select from. The temporary files will be occupying most of the spaces.
Step 8- Check the boxes you wish to clean. Click OK.
Do this and your system is clean of such files that were interrupting your work.
Uninstall & reinstall Windows OS
If the error is related to some specific program files then reinstalling Windows Operating System-related software could be the answer to the error.
Step 1- Click on the Start button. Then choose the option that says Open Programs and Features
Step 2- Now click on the Control Panel. this will be present on the right side menu.
Step 3- Then click Programs and Features.
Step 4- Now search to Locate VIDEO_SCHEDULER_INTERNAL_ERROR-associated program (eg. Windows Operating System). This you will find under the Name column.
Step 5- Select the Windows Operating System-associated entry.
Step 6- Then click the Uninstall button. You will find it present on the top menu ribbon.
Step 7- Lastly follow the on-screen instructions to complete the uninstallation of Windows associated programs.
After when you have successfully followed all the steps you will no more observe the same error.
Also Read: How to Fix Windows Update Error
Well, these were some of the best and sure shot methods that can be tried by you to fix the Video Scheduler Internal error in Windows 10 or Windows 8, 7, XP. Any of the above methods will work for you and all you have to do just find the right method that will work best for you.

