Do you get a WSAPPX high CPU usage error and not sure what it is and what you should do? In this article, we will walk through the function of wsappx in Windows and explain why the process can cause high CPU usage. Furthermore, we will detail several methods for solving this problem, so take a look below.
What Is wsappx?
Wsappx is a Windows process that many users will be familiar with because it can cause high CPU memory usage on a PC. However, it’s important to know that wsappx is a legitimate Windows process and is meant to be there. Many users confuse it as a virus, but that is not the case. Of course, that makes solving wsappx high CPU usage potentially harder because wsappx is embedded in Windows.
Check another Windows fix: Fix LockAppHost.exe High CPU Usage Error
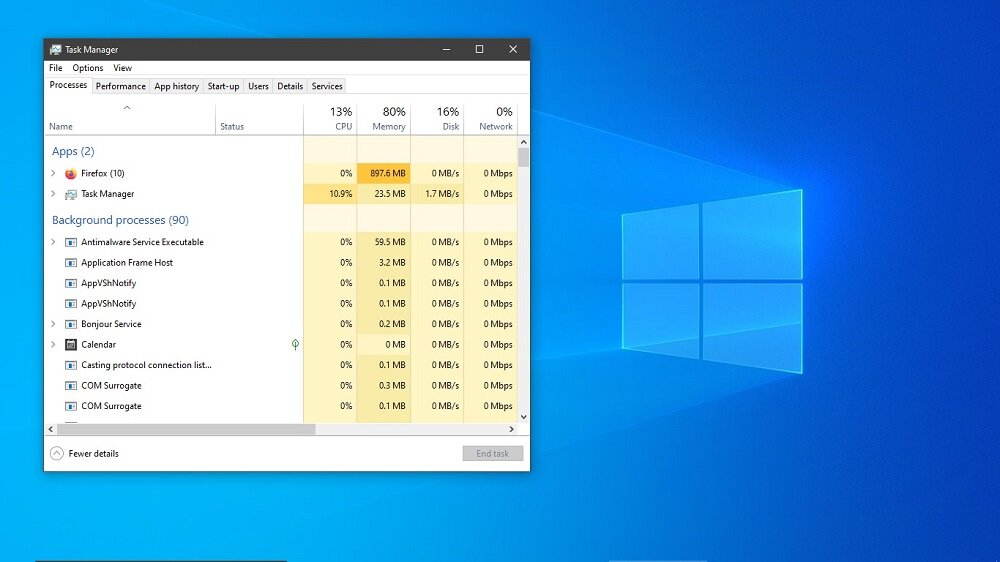
Wsappx is a process in Windows 8 and Windows 10 that you can find right now by heading to the “Process” tab of the Task Manager. This is a background process that is tied to Microsoft’s Universal Windows Platform and more specifically the Windows Store (now called the Microsoft Store).

Task Manager
Related Windows 10 Guides
Many users who encounter the wsappx high CPU usage problem ask what does this process do? Well, it handles app management from the Store. For example, it is the process that is responsible for installing, uninstalling, and updating applications on Windows. In other words, wsappx is a vital process if you want to use apps on Windows 10.
Check another Windows fix: Fix DPC Watchdog Violation Error in Windows [6 Ways]
Why Does WSAPPX Use CPU?
In simple terms, wsappx uses CPU power because it is a Windows process that runs in the background. As mentioned, it handles apps management related to the Windows Store.
However, once all app store updates and downloads are handled, you may not need wsappx running until you next need it. Sadly, it’s not as simple as just ending the wsappx process in the Task Manager. Microsoft says some sub services tied to the process are necessary to run apps without performance issues.
Sub services of wsappx are Appx Deployment Service (AppXSVC), Client License Service (ClipSVC) or Windows Store Service (WSService), as follows. ClipSVC is the process that Microsoft argues is important because it handles all infrastructure support for apps downloaded from the Store.
Check another Windows fix: [FIXED] GWXUX Has Stopped Working Error

Wsappx in system processes
Check another Windows fix: Fix Driver irql_less_or_not_equal Error [7 Methods]
Is 100% CPU Usage Bad?
In some circumstances, it is fine for a PC to run at 100% CPU use, but this situation would come with trade-offs in performance. And that’s really the problem with wsappx high CPU usage. When the process pushes CPU capacity too high, users experience a significant drop off in performance.
A CPU that is running at 100% essentially means your PC is attempting to do more processing work than it has capacity for. When high CPU usage persists, it can make a PC very slow and annoy users. Even if CPU usage is high – but not 100% – you will likely see performance problems such as lag.
Check Another Windows fix: Fix Windows Spotlight Not Working or Same Picture Error
What Causes The WSAPPX High CPU Usage Issue
In many cases of high CPU usage, the wsappx process is the root of the issue. This can happen when the process is working, which always happens when you have the Windows Store open. For example, if you open Task Manager when you’re browsing the store, you will see wsappx working.
For general store browsing, the process should stay relatively low. However, when you download or update an app, you should see the CPU load increase significantly. You may also see the process working when you are not in the store. That would usually mean there are updates waiting for native Windows apps, such as Paint.
Check Another Windows fix: How to Fix Kernel Data Inpage Error in Windows
How Do I lower The WSAPPX CPU Usage On Windows 10?
While you cannot disable wsappx directly, there are ways to stop it from starting automatically and lower the WSAPPX CPU usage on Windows 10 . The most common are:
- Run Windows Store Apps Troubleshooter
- Disable the Windows Store Using Registry Editor
Check Another Windows fix: 7 Ways to Fix Unexpected Store Exception Error in Windows 10
Run Windows Store Apps Troubleshooter
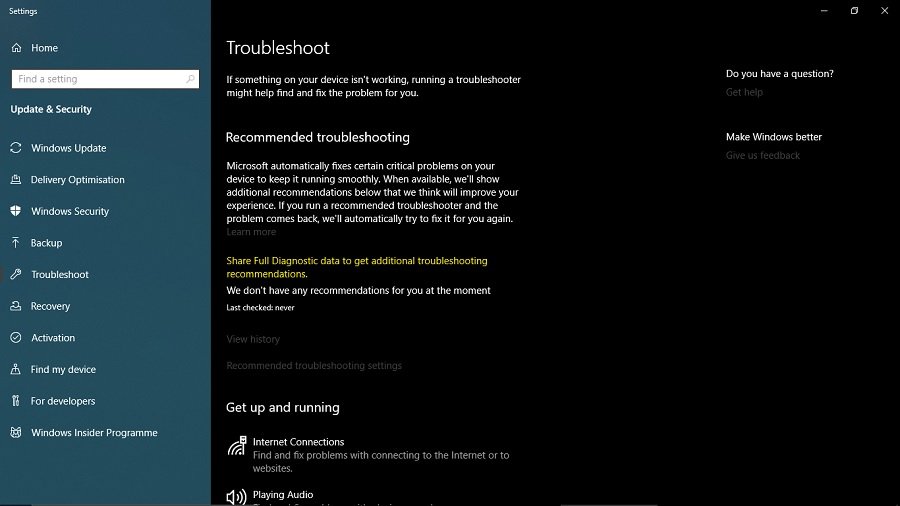
Before pressing ahead with deeper tweaks, it’s always a good idea to run the Windows troubleshooter. Microsoft has included numerous troubleshooters in Windows that help you by automatically diagnosing issues on the platform. They certainly don’t find ever problem, but they are a good place to start.

Troubleshooting can sometimes solve problems automatically.
Step 1. Open the Start menu.
Step 2. Select the Settings app.
Step3. Type “troubleshoot” into the search bar.
Step 4. Select “Troubleshoot” from the surfaced results.
Step 5. Locate “Windows Store App” (it can be found other “Fix and fix other problems”).
Step 6. Click “Run the troubleshooter”.
Windows will now automatically run diagnostics and show any issued with the Windows Store. If a problem is detected, follow the provides steps to solve it.
Check Another Windows fix: 5 Ways to Fix Windows Update Error 0x80070057
Disable the Windows Store Using Registry Editor
The next method is much more extreme and whether you use it will depend on how you use third-party services on Windows. You can choose to disable the Windows Store completely by editing the Windows Registry.

You can edit the registry to disable the Windows Store
Previously known as simple “the registry”, the recently revamped Windows Registry is the database for Windows configuration across the OS. Most information regarding software, hardware, preference, and OS tools are in the registry. By editing Windows Registry, you can make permanent changes that can only be reversed by returning to the registry and re-editing.
Here’s how to disable the Windows Store and avoid wsappx high CPU usage:
Step 1. Open the Registry Editor by pressing the Windows key + R to get to the Run dialog box.
Step 2. Type “regedit” into the dialog box and choose OK.
Step 3. When the editor opens, following this path: “HKEY_LOCAL_MACHINE\SOFTWARE\Policies\Microsoft\WindowsStore”. Note: Sometimes the WindowsStore key is not present so you will have to create it. You can do this by right clicking the “Microsoft” entry, choosing “New” and then “Key”. You can then name the entry “WindowsStore”.
Step 4. On the WindowsStore, right-click the background to start a DWORD value in the key. Name this “RemoveWindowsStore”. Choose “New” and the “DWORD (32-bit) Value”.
Step 5. Double click the new “RemoveWindowsStore” DWORD and the value date to 1. Restart the PC and the Windows Store will now be disabled.
Remember, if you take this path you will no longer have access to the Windows Store. That means you won’t be able to download new apps or update existing ones.
Check another Windows fix: Fix Windows 10 Microsoft Compatibility Telemetry High Disk Usage
Can I End WSAPPX?
As mentioned, ending the wsappx process in the Task Manager should be avoided. Windows actively warns users to not end the task because it can compromise the performance of apps. We would advise you to not end the process and instead follow one of the methods above for reducing wsappx high CPU usage
Check This: How To Install an All-in-One CPU Water Cooler
FAQs
What is wsappx?
Wsappx is a Windows process that handles app management from the Windows Store, including installs, uninstalling, and updates.
What causes wsappx high CPU usage?
Wsappx high CPU usage error appears when while wsappx is running in the background managing apps performance, it consumes excessive CPU usage which could harm the system performance. This usually happens when installing, uninstalling, or updating Store apps.
Is wsappx a virus?
Many people affected by high CPU usage caused by wsappx wrongly believe it is a virus. The process is part of Windows and arguably a vital component of the platform.


