Recently, many Windows 10 users have been reporting about a problem they have been facing. This problem occurs when they open photos while using the Photos app as the default image. The photos don’t get opened and instead they get the “The wait operation timed out” error.
This error generally appears when there is an unhandled exception while the execution of a current request. Also while trying to open the videos, some users get the same error message.
How to Fix The Wait Operation Timed Out
You can fix this by simply restarting the Explorer on the Task Manager. You can also try restarting the PC by pressing Ctrl + Alt + Del keys altogether. Perhaps, this will problem will continue to haunt you unless you go to its root. Only by reaching out the main cause of the problem, you can solve it.
So, If you’re one of the users who’s been facing this problem then you’re at the right place. I’ll tell you few solutions that you can use to remove this problem’s root. Soon, you’ll get rid of this problem with simple steps. So the solutions are:
1st Solution: Try re-installing the Photos App or the Movies & TV App
2nd Solution: Try to Run the Troubleshooters in Windows 10
3rd Solution: Renew IP Addresses from your Windows PC
4th Solution: Try Modifying the Host Files in your Windows 10
Buckle Up! We’ll start with our first solution.
1. Try re-installing the Photos App to fix wait operation timed out error
Step 1: Open the Taskbar search box and search for Powershell. Then, right click on Powershell and click on “Run as administrator” option. This will open Powershell as Admin.
Step 2: Click on the “Yes” button when a User Account Control prompt appears. Type this command “Get-AppxPackage -AllUsers” in the elevated Powershell.
Step 3: Scroll down and find an entry named Microsoft.Windows.Photos. Then copy its PackageFullName to the Notepad program.
Step 4: Next, All you need to do is execute the following command to uninstall the Photos App. “Remove-AppxPackage PackageFullName”
Note: In the above-given command, remember to replace the “PackageFullName” with the PackageFullName you copied to the Notepad program. This will uninstall Photos App form your Windows 10.
Now, get a fresh copy of that app from the Windows store. To do so, open the Windows Store app by clicking on the Store app from the Start menu. You can also search it from the Taskbar search box.
After opening the store, type “Microsoft Photos” in the search space. Then choose the result at the first and click the Free option. If the “Free” option turns gray, try to close the Windows Store app and open it again. This would fix your problem. Also if you have a nice internet connection, the Photos App would get installed in 5 mins.
2. Try to Run the Troubleshooters in Windows 10
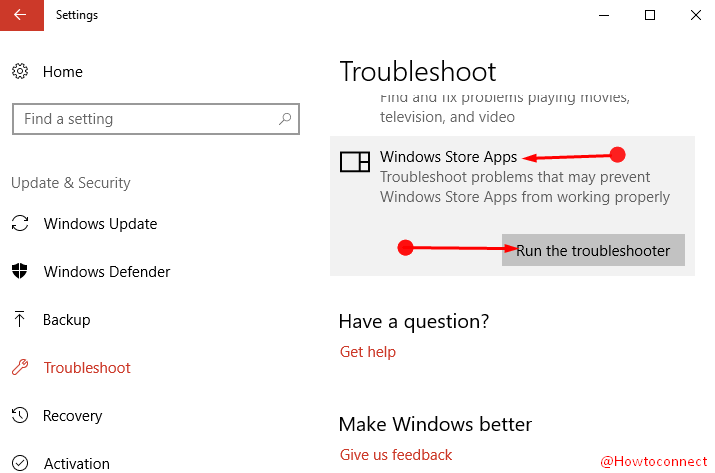
Step 1: Open the search box, type “Troubleshooting” and tap Enter. It will open the Windows Store Apps Troubleshooter.
Step 2: Choose the option “View All” located in the top left pane. This will display a list.
Step 3: Select the “Windows Store Apps” from the list.
Step 4: Now, you just need to follow the on-screen prompts. Soon, this process will get over.
Step 5: Make your to select the appropriate troubleshooter for the kind of problem you have.
Let’s take an example: For instance, if you’re having a problem with playing videos, you should select the Video Playback Troubleshooter from the Troubleshooters Settings page.
This will surely help you get rid of the error that has been causing a headache for a short while.
3. Renew the IP Addresses from your Windows PC
You can also simply solve your problem by renewing your IP Addresses. This won’t take much time is a very easy process with simple steps. So, just follow the steps and you’ll soon be issue-free.
Step 1: Click on the Start menu. Open the search box and search for Cmd (Command Prompt).
Step 2: Right-click on it and select the option “Run as administrator” there.
Step 3: Copy and paste the following command there “ipconfig/release” and press Enter.
Step 4: Now after that, copy and paste the following command “ipconfig/renew” and again press Enter.
Step 5: After doing the above steps, all you need to do is Restart or Reboot your PC.
That’s it! You’re done completing the steps. It is better to renew the IP Addresses of your PC. This can quickly fix this error “system.componentmodel.win32exception”. In other words, it will quickly fix the “The Wait Operation Timed Out” error on your Windows 10.
4. Modifying the host files in Windows 10
Your issue of fixing the error can be solved in many ways. One of those ways is modifying the host files available in your Windows PC. This process is simple with a few easy steps. If the above solutions didn’t bring a relief, this might be your another chance. Follow the steps below:
Step 1: Go to the Start menu. Search for My computer and open it.
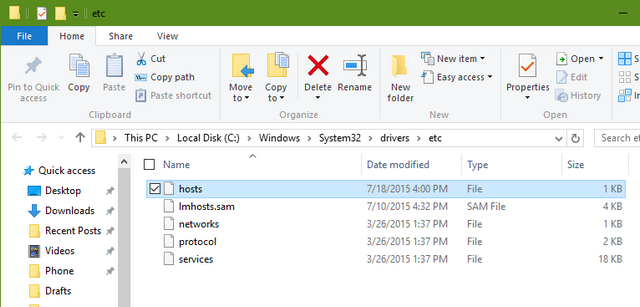
Step 2: Open this location in the files. Local Disk:C\Windows\System32\Drivers\ETC
Step 3: Find and right click on the file “Hosts”. Then select the option “Open in Notepad” there.
Step 4: Find and delete everything in the document which is written after the hashtag (#) sign.
Step 5: Click on the File Menu option. Save the file from there.
Step 6: Close Notepad.
End of it! See how simple it was to get rid of an error giving a headache for a lot many days. I’ve listed 4 solutions for all the Windows 10 users. These will help you to throw the “The Wait Operation Timed Out” error. So go on and see if the above methods are helpful for you. Comment down if you found this article useful to fix your issue.


