Wondering how to transfer photos from iPhone to iPhone? Buying a new iPhone and want to transfer all your photos from your old phone to the new one?
Stop wondering. You are on the right website now. Here in this article, I am going to show you multiple ways to transfer all your photos from one iPhone to the other without any physical connection between the two.
iPhone is the brand of smartphones designed and marketed by Apple. Whenever you want to transfer any data from one iPhone to another you need the help of some type of applications. Using these applications you can transfer images without the use of any Computer or any physical connection with cables. For faster transfer, you can even use your Computer.
You need to read this article:- How to Hard Reset iPhone 7
Here, I am going to show you how to transfer photos with three different ways in this article. The methods use applications like Airdrop, iCloud, iTunes etc to easily transfer images. So without wasting any further time, let’s start with our article.
Transfer Photos from IPhone to IPhone
If you are a new iPhone user, you might at some point of time struggle to transfer media from one iPhone to another. Yes, it’s easy to transfer media like images using social Networking applications like Whatsapp and Viber. But it only works effectively when you want to do so for a small number of photos. But what if the number of images you want to transfer is in Gb’s. Then it is not possible to do that via networking applications.
Here I am going to show you how to do that using three different methods. The first two methods are transferring images using Airdrop and iCloud. Both of these methods don’t require a computer. The third method is for those who have a computer near them. Transferring via computer is feasible when you have a large number of images to transfer.
- Transfer Images using Airdrop
- Transfer images using iCloud
- (Requires Computer) Transfer images using iTunes
So let’s learn all the three methods one by one. Follow along with these methods to easily transfer your images or photos from one iPhone to another.
Check this: How to Trust an App On iPhone
Transfer Photos using Airdrop
AirDrop is a service in Apple’s iPhone mobile devices. It allows you to transfer your files among other iOS devices or Mac Computers over Wi-Fi and Bluetooth, without using mail or a mass storage device. AirDrop protocol transfers files between a Mac and an iOS device as well as between two 2012 or newer Mac computers, and which uses both Wi-Fi and Bluetooth.
There is no restriction on the size of the file which AirDrop will accommodate. With this sharing feature of Airdrop, you can easily transfer your images. So, to learn how-to, follow the steps mentioned below.
- On Sender’s iPhone, swipe up from the bottom center of your screen to open the Control Center.
- Now long press on the box with Airplane Mode and Wifi Options.
- The box will expand.
- Click on the Airdrop button and choose everyone.
- From the receiver’s iPhone do the same thing to open Airdrop.
- From sender’s iPhone open the Photos app and select the images you want to transfer.
- Now click on Share button and choose Airdrop option.
- Select the receiver’s iPhone name from the list.
- On the receiver’s iPhone, tap on Receive from the pop-up menu.
Hurray! all your selected images will be transferred from one iPhone to another through Airdrop. Wait for the transfer to complete before transferring any more images or other documents. Airdrop can be used for transferring media, but it doesn’t store your images for future use. To get a backup of images while transferring them you can use iCloud.
Transfer Photos Using iCloud
iCloud is a cloud storage and cloud computing service from Apple Inc. iCloud enables users to store data such as documents, photos, and music on remote servers for download to iOS, macOS or Windows devices, to share and send data to other users. iCloud also provides the means to wirelessly back up iOS devices directly to iCloud, instead of being reliant on manual backups to a host Mac or Windows computer using iTunes.
Using iCloud you can first sync all your images to the iCloud server and then using the same iCloud ID on your other iPhone download it there. So to do so follow the steps mentioned below.
- First Login to your iCloud account on your first device (sender’s iPhone).
- Now go to Settings.
- Click on your name in the settings. This will open your Apple ID Menu.
- Tap on iCloud from the list given below your Name.
- Now tap on Photos.
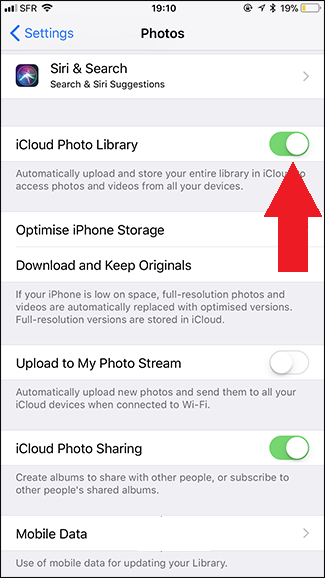
- Toggle the “iCloud Photo Library” to ON.
- Choose “Optimize iPhone Storage” or “Download and Keep Originals” from the screen.
- Your images from the photos app will start to upload.
- You can now login to the same iCloud account on the receiver’s iPhone.
- You can find all the uploaded images in the Photos app.
Hurray! all your selected images will be transferred from one iPhone to another through iCloud. This is an easy method to effectively transfer images to the other iPhone. But if you have a PC, you can do the same thing more effectively and rapidly through iTunes. Scroll down to see how.
You may also need this:- iTunes is currently downloading software for the iPhone Solution
Transfer Photos Using iTunes
iTunes is one of the most useful applications for iPhone users. iTunes allows you to backup all your data on your iPhone device so to restore it whenever you want. This backup data includes your images too. Note that for this method you need to have a computer or laptop with you. If you don’t have a computer or laptop then this method is not for you. Go back to the above steps to transfer photos without the use of any Computer. Windows users can get iTunes for free from Microsoft Website.
Note that the iTunes will erase the existing photos in Photo Library when you try to transfer photos to your new iPhone. So follow the steps mentioned below to easily sync all your photos to your mac to transfer it to the other iPhone.
- Open your Mac PC or laptop and connect your iPhone to it with the USB cable.
- Now open your Photos app and select all the images you want to transfer.
- Finally, click on Import or Import Selected to transfer photos from iPhone to Mac
- Now connect the receiver’s iPhone with the USB cable.
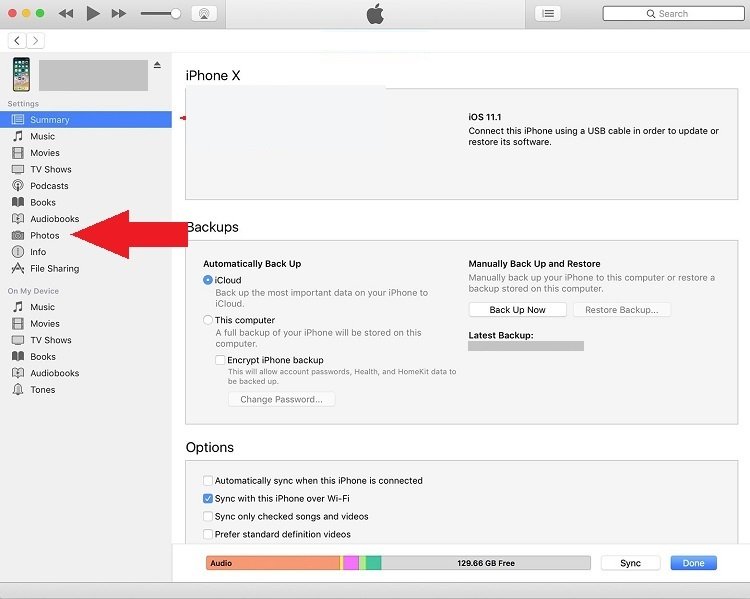
- Now open iTunes on your computer.
- Click on Devices button on iTunes Menu.
- Now click on Photos from the list on the left side.
- Select Sync Photos from Application or Folder.
- Lastly, click on the Apply button.
And that’s it. You have finally learned all the methods to transfer photos from one iPhone to another successfully. The iTunes method is most beneficial for you as it syncs all your photos and you will always have a backup for later use too.
Time To Transfer Your Photos From iPhone To iPhone
So you have seen all the methods by which you can easily transfer all your photos from your iPhone to iPhone. There are many other methods by which you can do the same thing. But I believe for a normal user, these methods are more than enough to transfer the photos easily. Again if you have just read the article and not do that. I recommend you to do so while reading the steps, to avoid any mistakes.
So that marks the end of our article. If you are having any difficulty or queries or doubts regarding any of the methods mentioned above. Feel free to mention them in the Comments Section below. I’ll be more than happy to help you with it. I hope now you don’t have to search anymore ‘How to transfer photos from iPhone to iPhone’ on the Internet.


